


-20-
W1701 1HP Shaper
OPERATIONS
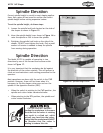
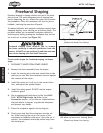
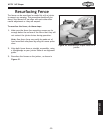
Freehand shaping is shaping without the aid of the miter
slot or fence. The most dangerous part of shaping free
-
hand is beginning the cut, where the cutter first contacts
the workpiece. Often the workpiece will tend to jerk or
kickback, catching the operator off guard.
To reduce kickbacks and maintain workpiece control when
freehand shaping, use a starting pin or starting block. The
pin/block allows you to maintain workpiece control by
anchoring and slowly pivoting the workpiece into the cut
-
ter as the cut is started (see Figure 34).
Freehand Shaping
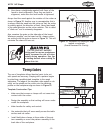
Figure 34. Starting pin operation
(Guard not shown for clarity).
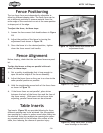
Figure 35. Hold-down jig used to support
workpiece.
Figure 36. A piece of wood clamped to
the table can serve as a starting block.
(Guard not shown for clarity).
To set up the shaper for freehand shaping, do these
steps:
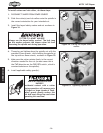
1. DISCONNECT SHAPER FROM POWER SOURCE!
2. Remove the fence assembly from the shaper.
3. Insert the starting pin in the best suited hole on the
table so you can feed the workpiece into and against
the rotation of the cutter.
4. Install the cutter so it will cut in the correct direc-
tion, and adjust the spindle height.
5. Install the safety guard. DO NOT use the shaper
without a guard.
6. Use a supplemental hold-down jig like the SHOP
FOX
®
W1500 Right Angle Jig shown in the
Accessories section, or you can use rubberized-han-
dle push blocks to support or guide the workpiece
and protect your hands.
7. Place the workpiece against the starting pin.
8. Slowly pivot and feed the workpiece into the cut-
ter. Avoid starting the cut on the corner of the
workpiece as kickback could occur. Once the cut is
started, the workpiece should be pulled away from
the starting pin.
Freehand shaping often requires you to remove
the fence resulting in reduced protection from the
cutters. ALWAYS use an auxiliary jig and take extreme
care when shaping with the fence removed.