


-49-
W1761/W1762 12" Table Saw with Riving Knife
SERVICE
Blade Tilt Stops
The table saw features stop bolts that stop the blade
exactly at 45° and 90° during blade adjustments.
The
stops have been set at the factory and should require
no adjustments, unless you notice that your cuts are not
accurate.
To set the 90
° stop bolt, do these steps:
1. DISCONNECT THE SAW FROM POWER!
2. Position the blade tilt to zero (see indicator on the
front of the saw), and raise the blade several inches
above the table.
3. Place a machinist’s square against the table and
blade so it contacts the blade evenly from bottom
to top. Make sure a blade tooth does not obstruct
the movement of the square.
— If the blade is 90° to the table when the stop bolt
contacts the underside of the table, go to To Set
the 45
° Stop Bolt.
— If the blade is not 90° to the table, you will need
to adjust the 90° stop bolt.
4. Tilt the blade to 20° to access the 90° stop bolt
under the table.
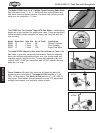
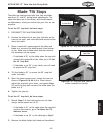
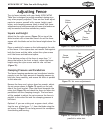
5. Open the motor access cover, loosen the jam nut
shown in
Figures 65 & 66 with a 12mm wrench,
adjust the stop bolt up or down, and repeat
Steps
2-3 until the stop bolt contacts the table when the
blade is at
0°.
6. Tighten the jam nut.
To set the 45° stop bolt, do these steps:
1. Repeat Steps 1-3 from the previous set of steps
using a combo square set to 45
°.
— If the blade is 45° to the table when the stop bolt
contacts the cabinet, go to
To Adjust the Tilt
Indicator Arrow
.
— If the blade is not 45° to the table go to Step 2.
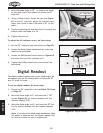
2. Remove the blade height lock knob and handwheel.
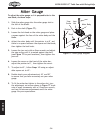
Figure 65. 90° stop bolt and jam nut.
90° Stop Bolt
& Jam Nut
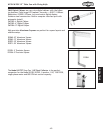
Figure 66. 90° stop bolt and jam nut
(table removed for clarity).
90° Stop Bolt &
Jam Nut