


10.
Assembly and adjustments
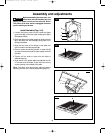
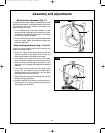
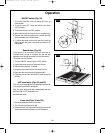
Install the fence (Fig. 7)
1. Raise the clamp (1) on the fence assembly to the up
position.
2. Place the fence on the table so that the clamp is at the
front of the table.
3. Lower the fence clamp to lock the fence in position on
the table. Rotate clamp to adjust tightness.
To move the fence, raise the clamp and slide the fence
to the desired location. Lower the clamp to lock the fence
in position.
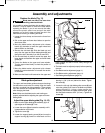
Mount the band saw to a work
surface (Fig. 8)
Secure the saw to a suitable work surface by inserting
the appropriate mounting hardware through the four pre-
drilled holes
(2) in the base of the saw.
Adjustments
Before adjusting the band saw, turn
off the saw, remove the safety key,
and unplug the power cord from the electrical outlet.
The power cord must remain unplugged whenever
you are working on the saw.
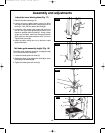
Table tilt adjustment (Fig. 9)
The table tilts from 0
°
to 45° to the right.
1. Turn the table tilt lock knob
(3) counterclockwise.
2. Turn the table tilt adjustment knob (4) until the pointer
is at the desired angle on the table tilt gauge (5).
3. Tighten the table lock knob (3) to secure the table.
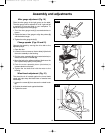
Connect to a dust collection
system (Fig. 10)
A 1 1/2" (3.8 cm) dust port (6) is located on the motor
side of the band saw. This port can be connected to a
dust collection system directly by connecting the pickup
end of the dust collection hose to the dust port.
FIG. 7
1
FIG. 8
2
2
FIG. 9
FIG. 10
4
5
3
6
WARNING
!
SM 2610957105 05-08 6/5/08 7:39 AM Page 10