


CAUTION: During the next step, the
chuck may come off suddenly, so it
is important that you are ready to
support its weight with a chuck cradle
to prevent crushing your fingers or
dropping the chuck.
4. Usingadeadblowhammerorother
softmallet,lightlytaparoundtheouter
circumference of the chuck body to break the
chuckfreefromthecamlocksandthespindle
nosetaper.
5. Usearockingmotiontocarefullyremovethe
chuckfromthespindle.
—Ifthechuckdoesnotimmediatelycome
off,rotatethechuckapproximately60˚
andtapagain.Makesureallthemarks
onthecamsandspindleareinproper
alignmentforremoval.
Operation
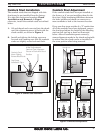
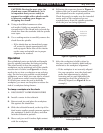
Non-cylindricalpartscanbeheldandbrought
intothespindlecenterlineforfacingorboring
Theotherbenetisthatthemajorityof
workpiecescanbepositionedoutofthespindle
rotationaxisifabore(seeFigure 9)orastep
needstobecutintoaworkpieceonanoutlying
edge.Forthebestgrippossibleonodd-shaped
workpieces,oneormorejawscanalsoberotated
180°tograbmoresurfaceareaforclamping.
Ifallfourjawscannotbeusedtoholdthe
workpiece,youmustusefaceplatetoreducethe
riskofaworkpiecebeingthrown.
To clamp a workpiece in the chuck:
1. DISCONNECTLATHEFROMPOWER!
2. Installacenterinthetailstock.
3. Retracteachjawand place the workpiece
flatagainstthechuckface.
4. Slidethetailstockforward,sothetipofthe
deadcenterappliesenoughpressureagainst
theworkpiecetoholditinplace,andthen
lockthetailstockinposition.
5. Moveeachjawuntilitmakeslightcontact
with the workpiece.
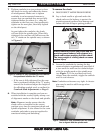
Figure 8. Tightening sequence.
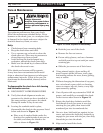
7. Aftertheworkpieceisheldinplaceby
thejaws,turnthechuckbyhandandpay
attention to the workpiece alignment.
—Iftheworkpieceisnotcorrectlyaligned
foryouroperation,turnthechuckand
makefineadjustmentsbyslightly
looseningonejawandtighteningthe
opposingjawuntiltheworkpieceis
correctlyaligned(seeFigure 9 for an
example).
1
2
3
4
Hole to be
bored into
workpiece
Figure 9. Non-concentric workpiece correctly clamped
in the 4-jaw chuck.
6. FollowingthesequenceshowninFigure 8,
tighteneachjawinsmallincrementstomove
theworkpieceintotherequiredposition.
Checkfrequentlytomakesuretheintended
centerpointoftheworkpiecehasnot
wanderedawayfromthespindlecenterline
whilethejawsarebeingtightened.
-6-
Mfg.Since5/10
Model SB1231
INSTRUCTIONS