


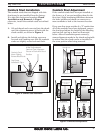

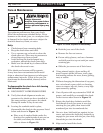
Jaw screw retaining pin
Set screw
a
Figure 10. Chuck sequence of disassembly.
Care & Maintenance
Always disconnect
machine from power before
performing maintenance or
serious personal injury may
result.
!
b. Backthejawsoutofthechuck
c. Removethefoursetscrews.
d. Putonsafetyglasses,anduseahammer
anddriftpunchtotapouteachjawscrew
retaining pin.
e. Slidethejawscrewsoutoftheirbores.
4. Usingmineralspirits,cleananddryall
parts.Inspectandxallbores,teeth,pins,
andmatingsurfacesforwear,burrs,galling,
rust,orcracks.
5. Withoutchangingthedimensionofanypart,
useawirebrush,emerycloth,ordressing
stonestoremoveallrust,burrs,oranyhigh
spotscausedbygalling.
6. CoatallpartswithanyautomotiveNLGI#2
grease,andcarefullyre-assemblethechuck
inthereverseordershowninFigure 10.
7. Rotatethechuckkeyclockwiseuntilthe
leadthreadofeachjawscrewisseenjust
enteringthejawguide,theninserteach
numberedjawintoitsnumberedslot.
8. Oneatatime,holdeachjawagainstitsjaw
screw,androtatethechuckkeyclockwiseto
engagethejawscrewwiththejaw,thenfully
threadthejawintothechuck.
9. Alignandre-installthechuck.
Foroptimumperformancefromyourchuck,
followthemaintenanceschedulebelow.Never
hammeronthechuck,jaws,oraworkpiecethat
isclampedinthechuck;andneversubjectthe
chucktoabrasives,ame,orwater.
Daily:
• Check/correctloosemountingbolts.
• Keep the chuck clean and oiled.
• Useavacuum,rag,orbrushtocleanthe
chuckafteruse. Neveruseairpressureto
cleanchipsawayfromachuck.
• Avoidleavingthechuckclampedona
workpiece,unloadthechuckjawsdaily.
• Makesurethechuckkeyisremovedfrom
thechuckwhennotinuse.
Ifthechuckeverbecomesstifftooperate,
itmayhavebeencontaminatedwithmetal
chipsorabrasivesfromincorrectorinfrequent
maintenanceintervals.Ifthisisthecase,the
chuckmustbedisassembled,cleaned,andre-
lubricated.
To disassemble the chuck for a full cleaning
and lubrication service:
1. DISCONNECTLATHEFROMPOWER!
2. Verifythatchuckalignmentmarksare
presentsothechuckcanbere-installedin
thesameposition,andremovethechuck.
Stampthemarksiftheydonotexist.
3. Leavingthecamlockstudsinplace,
disassemblethechuckinthesequencelisted
belowandshowninFigure 10.
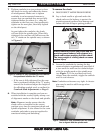
a. Placeasetofwoodenblocksunderthe
chucksothecamlockstudsdonotreston
thetable,andclampthechucktothe
tableasshowninFigure 10.
b
c
d
e
d
Mfg.Since5/10 Model SB1231
-7-
INSTRUCTIONS