


6
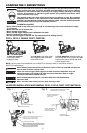
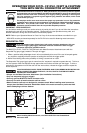
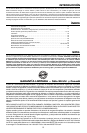
1. Open the magazine:
Pull pusher back to
engage the latch.
2. Load Nails: Hold nailer down
with magazine tilted downward.
Insert stick of nails
3. Close Magazine: Release pusher by
first pulling back on the pusher and then
pressing the pusher release tab. Slide
pusher against nails.
NOTE:Use only nails recommended for use in BOSTITCH Framing nailers or nails which meet the
BOSTITCH specifications.
When installingmetal connectors with the F21PL,F21PL2, F33PTor F33PTSM:use only one
stick of metal connector nails at a time.
Never use contact trigger (black trigger) with metal connector attachment. Only use
sequential trigger (gray trigger) with metal connector attachment. Refer to trigger
conversion instruction included in the kit.
When installing Metal Connectors, use ONLY BOSTITCH Heat Treated Metal
Connector Nails.
Never use rafter hook to hang tool from body, clothing or belt.
LOADING THE F SERIES TOOLS
EYE PROTECTION which conforms to ANSI specifications and provides protection against
flying particles both from the FRONT and SIDE should ALWAYS be worn by the operator
a
nd others in the work area when connecting to air supply, loading, operating or servicing
t
his tool. Eye protection is required to guard against flying fasteners and debris, which
could cause severe eye injury.
The employer and/or user must ensure that proper eye protection is worn. Eye protection
e
quipment must conform to the requirements of the American National Standards Institute,
A
NSIZ87.1 and provide both frontal andside protection. NOTE: Non-sideshielded spectacles
and face shields alone do not provide adequate protection.
T
O PREVENT ACCIDENTAL INJURIES:
•
Never place a hand or any other part of the body in nail discharge area of tool while the air supply
i
s connected.
•
Never point the tool at anyone else.
•
Never engage in horseplay.
•
Never pull the trigger unless nose is directed at the work.
•
Always handle the tool with care.
• Do not pull the trigger or depress the trip mechanism while loading the tool.
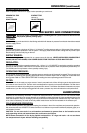
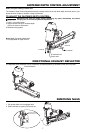
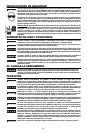
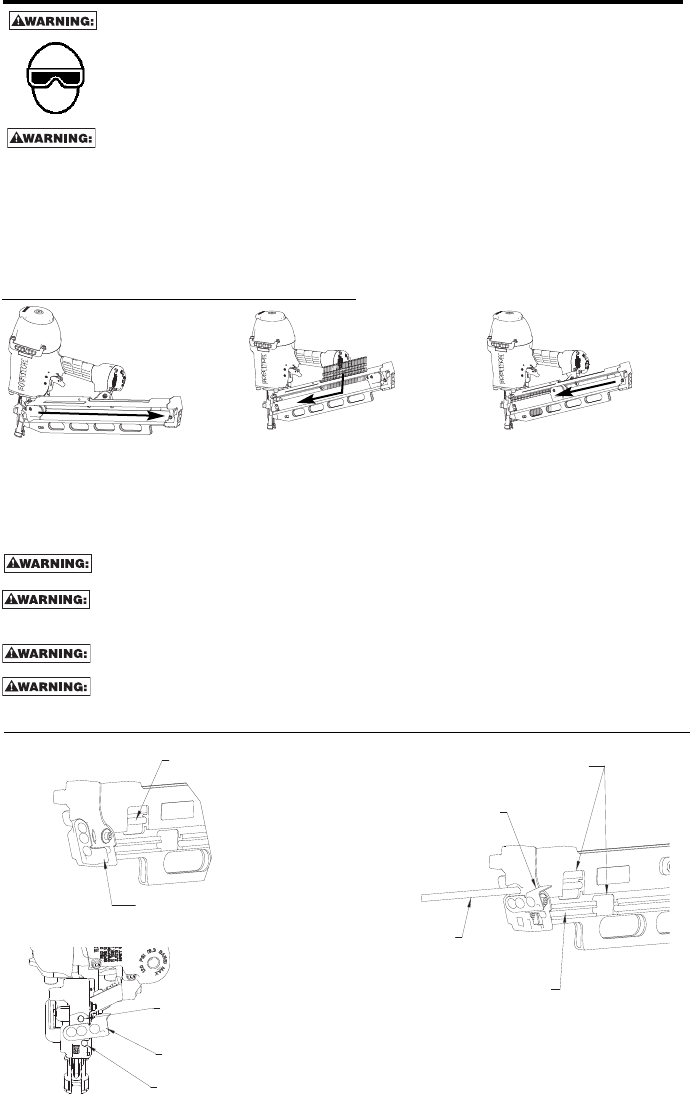
F21PL, F21PL2, F28WW, F33PT, F33PTSM
PULL HERE AND ROTATE
COVER TOOPEN
GUIDE ROD
ACCESS WINDOWS FOR INSTALLATION
AND REMOVAL OF GUIDE ROD.
ROTATE COVER OPEN TO
INSTALLORREMOVE
GUIDE ROD.
INSTALL OR REMOVE
GUIDE RODTHRU
REAR OF MAGAZINE.
GUIDE ROD
STORAGE CHANNEL
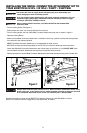
GUIDE ROD INSTALLATION AND REMOVAL F21PL, F21PL2, F33PT, F33PTSM TOOLS:
INSTALL GUIDE ROD THRU HERE TOPHOLE
FOR .113" TO .131" SHANKNAILS
ROTAT E COVER BACK TO CLOSE.
COVER ROTATED OPEN
R
INSTALL GUIDE ROD THRU HERE BOTTOM HOLE
FOR STORAGE ALONG OUTSIDE OF MAGAZINE
FOR .131"TO.162" SHANK NAILS
ROTAT ECOVER BACK TO CLOSE.
Fig. 1
Fig. 2
Fig. 3