


6 7
Installation
All ProSport battery chargers are designed to be permanently mounted on-board and can be mounted with
the extruded fins placed vertically or horizontally. Always mount your ProSport charger in a compartment area
that can be properly ventilated during use.
Do not mix battery types on-board. All batteries should be of the same age and in good operating condition.
Do not make any electrical connections to the ProSport or to the batteries until the following steps are
completed:
11 Easy-to-follow Installation Steps:
1. Select a mounting location that allows for free air ventilation with a minimum of 8 inches of clear,
unobstructed space around and in front of the charger. Open all battery and engine compartments and
ventilate for at least 15 minutes before starting the installation of the charger.
2. Confirm the selected mounting location allows for a minimum of 8 inches of free space around the front and
the sides of the charger. Do not install the charger on carpeted, upholstered, vinyl or varnished surfaces. Be
sure to place the ProSport charger in an accessible area where all indicators are viewable. Confirm all battery
cables can reach each of the batteries.
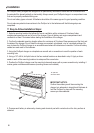
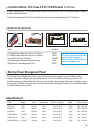
3. Using the ProSport charger as a template use a small awl or screwdriver to mark the position of each
mounting hole.
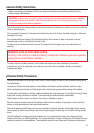
4. Using a 1/8” drill bit, drill pilot holes in the four marked locations as described in step 3. Apply a silicon
sealer in each of the mounting locations to waterproof the screw holes.
5. Position the ProSport charger over the mounting holes and secure with a power screwdriver by installing 4
marine grade or stainless steel screws (mounting screws not included).
1/8" pilot hole
with silicon sealer
6. Prepare each battery in advance by cleaning each terminal post with a wire brush until a shiny surface is
obtained.
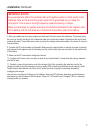
IMPORTANT NOTICE:
Confirm the surface you will be mounting the
charger to is adequate in strength and thickness to
hold the ProSport in place with the mounting
screws you have selected.
Installation Continued
IMPORTANT NOTICE:
As you prepare to attach the positive (red) and negative (yellow or black wires) to the
batteries there will be a brief low power spark that is generated as you make the
connection. This is due to the high frequency capacitors taking a charger.
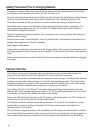
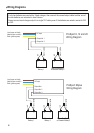
Make sure the black (or yellow) wires are connected as illustrated to the negative side
of the battery and the red wires are connected to the positive side of the battery.
7. Run your cables free from sharp objects and hold each of them in place with cable ties. Coil excess cable,
do not cut or shorten the length of the cables as there are in-line fuses located 4 inches from the end of each
positive(red) cable. These fuses are in place to protect the charger and output cables in the event of a short or
reverse polarity..
8. Connect the DC output cables as illustrated. Make sure the negative (black or yellow) wires are connected
as illustrated to the negative side of the battery and the positive (red) wires are connected to the positive side
of the battery.
9. Make sure all DC connections are tight and correct.
10. Locate the AC power cord in an open-air area of your boat at least 21 inches from the charger, batteries
and fuel fill lines.
11. Connect a heavy duty extension cord to the charger first. After connecting the extension cord to the
charger proceed to plug the extension cord to a nearby RCD-protected (ground fault circuit interrupt) outlet.
Always remove the extension cord from the AC outlet first when charging is completed, followed by
unplugging the charger.
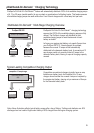
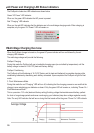
You are now connected and charging your batteries. View the LED indicators. Assuming your batteries are
discharged you should observe both the green “Power On” LED and the red “Charging” LED on, indicating
charging mode is in process.