


8 9
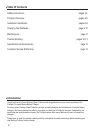
Engine Start Battery
or Domestic Battery 2
Domestic
Battery 1
+
_
+
_
AC Input
Output No. 1
Output No. 2
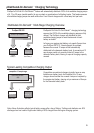
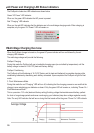
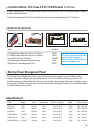
ProSport 8, 12 and 20
black or yellow
red
Wiring Diagram
black or yellow
red
Live (brown or black)
Neutral (blue or white)
Earth (yellow-green)
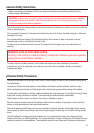
Charging Your Batteries
Domestic
Battery 1
+
_
+
_
+
_
AC Input
Output No. 1
Output No. 2
Output No. 3
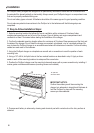
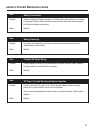
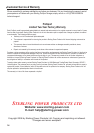
ProSport 20plus
Wiring Diagram
black or yellow
red
black or yellow
red
black or yellow
red
Domestic
Battery 2
Engine Start Battery
or Domestic Battery 3
Live (brown or black)
Neutral (blue or white)
Earth (yellow-green)
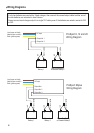
Wiring Diagrams
If only two batteries are used with a 3-bank charger, then connect the unused output cable to either one of
the two batteries, as instructed in item 8 above.
Always connect each charger output to a single 12V battery even if the batteries are wired in series for 24V
or 36V.
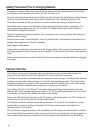
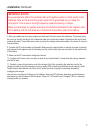
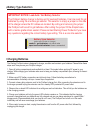
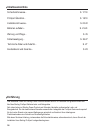
IMPORTANT NOTICE: Lead-Acid / Gel Battery Selector
The ProSport battery charger is factory set for lead-acid batteries. It can be reset for gel
batteries by using the one-time gel selector. This selector is simply a jumper on the side
of the charger where the DC cables are located. By cutting and removing the jumper
the ProSport will be set for gel batteries. After cutting the jumper fill the dimpled area
with a marine grade silicon sealant. Please contact Sterling Power Products if you have
any questions regarding the correct battery type setting. This is a one-time selector.
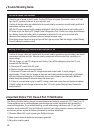
Battery Type Selector
(yellow wire on side of charger)
sealed + gel batteries: cut yellow wire
open lead-acid batteries: leave connected
Battery Type Selection
Charging Batteries
The Sterling ProSport series is designed to charge, condition and maintain your batteries. Please follow these
steps each time you use your ProSport charger.
1. Open all battery compartments and ventilate for at least 15 minutes before applying AC power to your
charger. While charging your batteries make sure to keep your battery compartment open, allowing for free air
ventilation.
2. Make sure all DC battery connections are tight and clean. Follow the battery manufacturer’s
recommendation for battery cell caps. Loosen caps if applicabel.
3. Connect a heavy duty extension cord to the ProSport charger first. After connecting the extension cord to
the charger proceed to plug the extension cord to a nearby RCD-protected AC power outlet.
4. Observe the on-board LED indicators for a solid green and red indication. This will tell you the batteries are
in the charging process.
5. Charge your batteries until only the green LED indicator remains on. This indicates that the charging
process is completed and your batteries are fully charged and are now being maintained in a gentle float /
storage mode. (Recommended while your boat is not in use.) The ProSport can be left on in this mode
indefinitely and will never overcharge your batteries.
6. When ready to use your boat, unplug the extension cord from the AC power outlet first, followed by
unplugging the charger.