


6
Building and deploying Sun SPOT applications
Deploying and running a sample application
The normal process for creating and running an application (assuming you are working from the
command line rather than an IDE) is:
• Create a directory to hold your application.
• Write your Java code.
•
Use the supplied ant script to compile the Java and bind the resulting class files into a
deployable unit.
• Use the ant script to deploy and run your application.
In this section we will describe how to build and run a very simple application supplied with the
SDK. Each step is described in detail below.
1. The directory
Demos/CodeSamples/SunSpotApplicationTemplate
contains a very simple Sun
SPOT application that can be used as a template to write your own.
The complete contents of the
template
directory should be copied to the directory in which you
wish to do your work, which we call the root directory of the application. You can use any
directory as the root of an application. In the examples below we have used the directory
C:\MyApplication
.
All application root directories have the same layout. The root directory contains two files -
build.xml
and
build.properties –
that control the ant script used to build and run applications.
The root directory also contains three sub-directories. The first, named
src,
is the root of the
source code tree for this application. The second, named
nbproject
, contains project files used if
your IDE is Netbeans. The third, named
resources
, contains the manifest file that defines the
application plus any other resource files that the application needs at run time. Other directories
will appear during the build process.
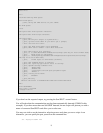
2. Compile the template example and create a jar that contains it by using the “
ant jar-app
”
command. The created jar is called
imlet.jar
and is created in the
suite
folder.
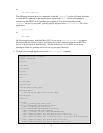
C:\MyApplication>ant jar-app
Buildfile: build.xml
-pre-init:
-init-user:
-init-system:
-do-init:
-post-init:
init:
-set-jar-name:
-pre-clean:
-do-clean: