


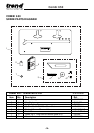


Combi 650
-9-
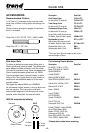
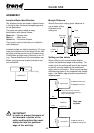
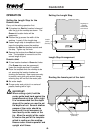
Length Stop Arrangement
OPERATION
Setting the Length Stop for the
Female Joint
Carry out the setting operation first:
■ Fit bushes into Red dot location holes and
offer the jig to the worktop as shown. The
Green dot location holes will be
uppermost.
■ Position the jig across the width of the
worktop. Loosely fit the length stop.
■ Fasten length stop to template so that it
traps the template across the worktop
between the Red dot location bushes and
the stop. Tighten up the knob.
■ Remove the bushes from Red dot location
hole. The template is now set to cut the
correct length of joint.
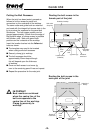
Female Joint
■ Fit two location bushes in Green dot holes.
(The Green dots must be uppermost.)
Leave the length stop bush in position.
■ Place the template onto the worktop to be
cut, ensuring the location bushes are
touching the worktop. Now cramp securely
in position using two quick action clamps
ensuring they will not foul the router path.
■ Set cutter depth.
■ Plunge router and cut joint in a series of
passes, feeding left to right.
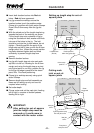
IMPORTANT!
When cutting a joint, hold the
router guide bush hard against the
template and cut from left to right.
It is recommended that the depth
stops of the router are used to set
the depths of cut. Several shallow
passes of the router should be
made and it is not necessary to
lean heavily on the router or the
jig. Allow the weight of the router
to rest on the part of the template
which is resting on the worktop.
Ensure router remains parallel and
upright at all times.
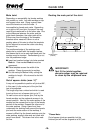
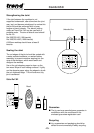
Routing the female part of the Joint
Setting the Length Stop
Location
bushes
(Red dot)
Postform edge
Length stop on
underside.
Retained with
screw & knob
Location bushes
(Green dot)
Postform
edge
Length stop