


10 ProSpray 3.25
GB
Starting operation
4.5 Cleaning preserving agent when starting-up
of operation initially
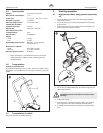
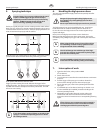
1. Depending on the model, swivel or immerse the suction tube
(Fig. 7, Item 1) or the suction hose and return hose (2) into a
container with a suitable cleaning agent.
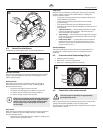
2. Turn the pressure control knob counterclockwise (3) to
minimum pressure.
3. Open the relief valve (4), valve position PRIME
(k circulation).
4. Switch the unit (5) ON.
5. Wait until the cleaning agent exudes from the return hose.
6. Closethereliefvalve,valvepositionSPRAY(p spray).
7. Pull the trigger of the spray gun.
8. Spray the cleaning agent from the unit into an open collecting
container.
1
3
2
4
5
4.6 Taking the unit into operation with coating
material
1. Depending on the model swivel or immerse the suction tube
(Fig. 7, Item 1) or the suction hose and return hose (2) into the
coating material container.
2. Turn the pressure control knob counterclockwise (3) to
minimum pressure.
3. Open the relief valve (4), valve position PRIME
(k circulation).
4. Switch the unit (5) ON.
5. Wait until the coating material exudes from the return hose.
6. Closethereliefvalve,valvepositionSPRAY(p spray).
7. Trigger the spray gun several times and spray into a collecting
container until the coating material exits the spray gun
without interruption.
8. Increase the pressure by slowly turning up the pressure
control knob.
Check the spray pattern and increase the pressure until the
atomizationiscorrect.
Always turn the pressure control knob to the lowest setting
withgoodatomization.
9. The unit is ready to spray.
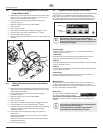
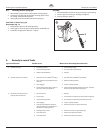
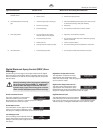
4.7 Digital Electronic Spray Control (DESC)
The Digital Electronic Spray Control (DESC) increases the functionality
of the sprayer. It is installed directly below the pressure control
knob on the control panel. It consists of a display and four function
keys. The display shows various menu screens that allow the user to
customizeandmonitorsprayeroperationusingthefunctionkeys.
SET MPa 23.0
ACTUAL MPa 22.5
Display
Function
Keys
i
The pressure control knob overrides the Digital
Electronic Spray Control (DESC) settings. Anytime the
pressure control knob is turned, the sprayer pressure
will change accordingly.
Function Keys
The function keys are numbered 1–4. Each key is labeled with an
additional function as well.
#1/Menu Key
Pressing the #1 key scrolls through the available menu screens or
performs a function described on the active menu screen.
#2/g Key
Pressing the #2 key performs a function described on the active menu
screen or increases a value.
#3/h Key
Pressing the #3 key performs a function described on the active menu
screen or decrease a value.
#4/Select Key
Pressing the #4 key selects the active menu screen or performs a
function described on the active menu screen.
Menu Screens
Severalmenuscreensareavailablefortheusertocustomizeand
monitorsprayeroperation.TheyincludeMainScreen,Volume
Pumped,JobVolume,UnitSerial#,Timers,JobTimers,ServiceTime,
Security Code, Prime, and Rapid Clean.
Main Screen
SET MPa 23.0
ACTUAL MPa 22.5
The Main Screen is the default screen for
the control system at sprayer startup.
Pressing the #2 key switches between PSI, Bar and MPa units of
measure. Press the #1 key to scroll through the remaining menu
screens.
i
For sprayers equipped with an nine-language Digital
Electronic Spray Control (DESC):
Pressing the #2 key at the Main Screen switches
between PSI, Bar and MPa units of measure.