


4 © Wagner. All rights reserved.
Preparing to Paint
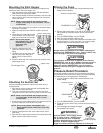
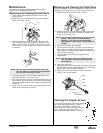
Attaching the Tip to the Gun
1. Lock the trigger by rotating the trigger lock forward until it
stops.
POSSIBLE INJECTION HAZARD. Do not spray without the
tip guard in place. Never trigger the gun unless the tip is
in either the spray or the unclog position. Always engage
the gun trigger lock before removing, replacing or
cleaning tip.
2. Thread the tip guard onto the gun. Tighten the nut first by
hand, then tighten more firmly with a wrench.
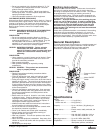
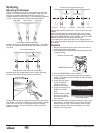
Checking the Outlet Valve (optional)
1. Firmly press the optional pusher valve button on the side
of the pump housing to make sure the outlet ball valve
moves freely.
Pusher Valve Button
(optional)
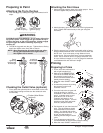
Begin
tightening
the tip guard
at this angle
to achieve
the desired
spray angle
when tight.
NOTE: When attaching the tip guard to the gun, align
the tip guard as shown in the figure below,
then tighten with a wrench.
WARNING
Trigger locked
(gun will not spray)
Trigger unlocked
(gun will spray)
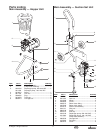
Attaching the Paint Hose
1
. Attach the high pressure hose to the paint sprayer. Use a
w
rench to tighten the paint hose securely.
2. Attach the spray gun to the other end of the high pressure
hose. Tighten the hose securely to the gun using two
wrenches.
3. Plug the sprayer into a properly grounded outlet or heavy
duty grounded extension cord. Do not use more than 100
feet of cord. If you must spray a long distance from a
power source, use more paint hose, not more extension
cords. Use a minimum size of 16 gauge extension cord
for up to 50 feet in length, or 12 to 14 gauge for extension
cords between 50 and 100 feet in length.
Priming
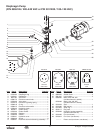
Preparing to Prime
1. Fill the inlet valve with water or
with a light household oil.
2. Make sure the PRIME/SPRAY
valve is set to PRIME and that
the pressure control knob is
turned counterclockwise to the
lowest pressure setting.
3.
Move the motor ON/OFF switch
to ON.
4. Increase the pressure by turning
the pressure control knob
clockwise 1/2 turn.
5. Force the inlet valve to open and
close by pushing on it with a
screwdriver or the eraser end of a
pencil. It should move up and
down about 1/16 of an inch.
Continue until water or oil is
sucked into the sprayer. This will
wet the moving parts and break
loose any old paint residue.
6. Put the palm of your hand over the
inlet. Turn the pressure control
knob clockwise to its maximum
setting. You should feel suction
coming from the inlet valve. If you
do not, see the section on
cleaning and servicing the outlet
valve.
7. Turn the pressure control knob
counterclockwise to the minimum pressure setting.
8. Move the motor ON/OFF switch to OFF.
R
GB