


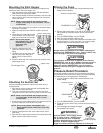
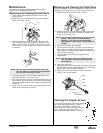


Mounting the Paint Hopper
Use the following procedure to mount the paint hopper and
attach the return tube on a hopper unit.
1. Align the bottom of the paint hopper with the threaded
inlet valve on the paint pump block.
2. Turn the paint hopper clockwise to thread it onto the inlet
valve. Continue to turn the paint hopper until it is secure
on the inlet valve.
3. Place the filter screen into the bottom of the paint hopper
and snap it in position.
4
. Make sure that the motor ON/OFF switch is turned to
O
FF.
5
. Screw the return tube fitting found
in the literature set into the return
tube port on the side of the pump.
6. Place the straight end of the
return tube into the return tube
fitting.
7. Thread the nut on the return tube
onto the return tube fitting and
tighten until the return tube is
secure.
8. Place the hook end of the return tube into the hole in the
paint hopper cover.
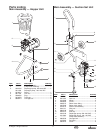
Attaching the Suction Set
Use the following procedure to attach the suction set to a
suction set unit.
1. Align the nut on the suction set with the threaded inlet
valve on the paint pump block.
2. Turn the nut clockwise to thread it onto the inlet valve.
Continue to turn the nut until it is secure on the inlet valve.
3. Screw the return tube fitting found in the literature set into
the return tube port on the side of the pump.
4. Place the straight end of the return tube into the return
tube fitting.
5. Slide the return tube clamp onto the return tube fitting and
tighten until the return tube is secure.
NOTE: Do not over-tighten. Hand-tighten only.
Some threads will be visible even when fully
tightened.
NOTE: Make sure the threads are straight and the
nut turns freely on the inlet valve. Do not
cross-thread.
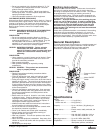
Return Tube
Paint Hopper Cover
NOTE: Do not over-tighten.
Hand-tighten only. Some
threads will be visible
even when fully
tightened.
Return Tube Fitting
Return Tube
NOTE: Make sure the threads are straight and the
hopper turns freely on the inlet valve. Do not
cross-thread.
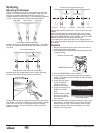
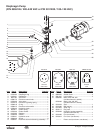
Priming the Pump
1. Turn the pressure control knob counterclockwise to its
lowest pressure setting.
2
. Remove the paint hopper cover and fill the paint hopper
w
ith material or place the suction set into a bucket of
material.
3. Turn the PRIME/SPRAY valve to PRIME.
4. Move the motor ON/OFF switch to ON.
5. Turn the pressure control knob clockwise to between half
and full pressure. Let the unit prime 1 to 2 minutes after
material begins to flow through the return tube.
Always reduce the pressure to zero before changing the
position of the PRIME/SPRAY valve. Failure to do so may
cause damage to the paint pump diaphragm.
If the pressure control knob is reduced to zero and the
PRIME/SPRAY valve is still on SPRAY while the sprayer is
operating, there will be high pressure in the hose and
spray gun until the PRIME/SPRAY valve is turned to
PRIME or until the spray gun is triggered to relieve the
pressure.
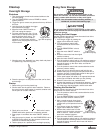
Pressure Relief Procedure
Follow this procedure after the unit is assembled and before
any operation which involves the spray gun such as cleaning
and maintenance or changing tips or accessories.
1. Turn the pressure control knob counterclockwise to its
lowest setting.
2. Turn the PRIME/SPRAY valve to PRIME.
3. Trigger the gun to remove any pressure that may still be in
the hose.
4. Lock the trigger by rotating the trigger
lock forward until it stops.
Injection hazard. Do not spray without
the tip guard in place. NEVER trigger
the gun unless the tip is completely
turned to either the spray or the unclog
position. ALWAYS engage the gun
trigger lock before removing, replacing or cleaning tip.
WARNING
Trigger locked
(gun will not spray)
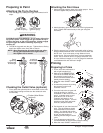
Pressure Control
Knob
PRIME/SPRAY
Valve
CAUTION
CAUTION
Pressure Control Knob
P
RIME/SPRAY Valve
© Wagner. All rights reserved. 5
GB
R