


GA 250AL_GA 400AL.
21
!
%
$
#
"
"?
OPERATING MANUAL
EDITION 07 /2005 PART NO. DOC0350941
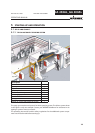
5.4 WORK
5.4.1 START-UP FOR AIRLESS SPRAYING
1. Switch on the material supply (adjust from approx. 150 bar; 15 MPa; 2175 psi), and the
control unit.
2. Spray on a test object.
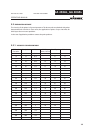
3. Adjust the spray pressure and atomizing air in accordance with the nozzle and object.
Note:
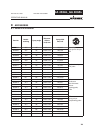
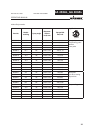
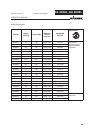
The paint output volume can be changed by:
•
Changing the material pressure.
or
•
Fitting another fl at jet nozzle. See accessories.
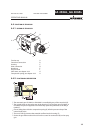
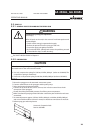
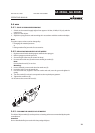
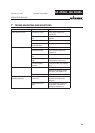
5.4.2 REPLACING THE AIRLESS FLAT JET NOZZLE
1. Replace material with cleaning agent and fl ush the spraygun.
2. Relieve spraygun and unit pressure.
3. Secure the gun. (Remove the control air hose)
4. Unscrew the nozzle nut (E) and remove the fl at jet nozzle (D).
Note:
Ensure that the seal (C) is not lost.
Mounting:
5. Insert a cleaned or new nozzle into the nozzle nut (E).
6. Insert the seal (C) into the nozzle nut.
7. Put the nozzle nut, together with the nozzle and seal, onto the gun and tighten it
gently.
8. Turn the nozzle (D) so that it corresponds to the required spray pattern.
9. Tighten the nozzle nut (E).
10. Reconnect the control air hose (A).
5.4.3 CLEANING THE AIRLESS FLAT JET NOZZLE
The Airless fl at jet nozzle (D) can be put into a cleaning solvent recommended by the paint
manufacturer.
Attention
Do not handle the fl at jet noozle with sharp-edged objects.