


38
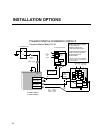
• Testing for backfeed. If a backfeed
condition is indicated, disconnect from
shorepower and disconnect the AC output
wires from the inverter. Make sure the inverter
is OFF.
Caution: Apply shorepower and measure for
voltage between the black and white wires that
were attached to the inverter output feeding the
electrical panel or loads, not the inverter output
wires. If there is voltage on these wires, a
backfeed condition exists and must be
corrected or damage will result.
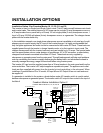
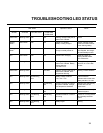
3. Test the battery charger function:
• With shorepower applied and the
transfer switch engaged, the battery charger
should be in operation. The CHARGE LED will
blink for 8 seconds. After the 8 seconds, the
unit will enter the charge mode and the LED
will be illuminated. (When using Temperature
Sensitive Charging, this time may be longer.)
When AC is available, the unit will auto-
matically default to charge mode without the
operator setting the unit in CHARGE mode. It is
necessary to press the CHARGE switch OFF,
if you do not want to charge.
Verify the charger is working by using a
volt meter. Use this same method on the start
or auxiliary battery connected to the echo-
charge to verify echo-charge operation. The
battery voltage should gradually increase.
If using a Remote Control Panel, DC Amps
LED indicates charger output and the DC Volts
LED indicates an increase in battery voltage.
Note: The house battery bank must be above
13.0 volts for the echo-charge to be operational.
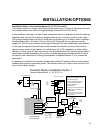
INSTALLATION CHECKS
• Turn the inverter ON—the green LED
should blink. Remove shorepower and the
inverter should automatically pick up the AC
load when shorepower is removed.
Repeat the test for transfer and battery
charger with the generator if you have one.
Congratulations, you have completed a
successful installation.
Note: For low power system shutdown
mode, both the INVERT and CHARGE LEDs
must be OFF.