


Installing the XC Series
975-0187-01-01 2–3
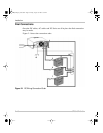
Pre-Installing DC Wiring
The procedure for installing the DC wiring applies to a single battery or multiple
batteries or battery banks.
To install DC wiring:
1. Identify the battery or bank that most frequently becomes deeply discharged.
This bank will often be a deep cycle battery referred to as the House Bank on a
boat, as opposed to an engine Start Battery. This high priority bank should be
connected to bank 1 on the XC Series, which is the default bank.
2. Plan the route that the DC wires will follow, keeping it as short as possible.
Measure and cut the required wire length. Allow some extra length for
connections and to provide slack in the wires.
Note: The connection to the battery negative circuit may not be at a battery, but
may be at an engine negative bus or a DC negative bus. If in doubt, consult the
boat schematics.
3. Identify the positive wires, by using color-coded wire or by marking both ends
of the wire with colored tape or similar kind of marking. Repeat with a different
color for the negative. Most installation codes recommend coloring the positive
red and the negative black.
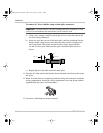
4. Install a DC circuit breaker or fuse/disconnect in each positive cable close to
each battery. For your applications and jurisdiction, consult your local electrical
codes regarding the distance between the battery and the disconnect device. Be
sure the breaker is open or fuse is not inserted at this time.
WARNING: Shock or arc burn hazard
To help prevent accidental shorts or sparks, leave the DC disconnects or breakers in the Off
position or fuses removed from their fuse holders until installation is complete.
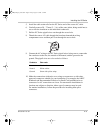
Important:
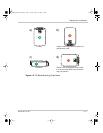
Xantrex recommends that you install the rubber boots over the XC Series DC
terminals to provide drip protection and increased protection from short circuits. You need
to install the boots before doing any other DC wiring. See “To install rubber boots:” on
page 2–14.
Important:
You may find it helpful to label each cable, associating it with the battery
bank it is connected to. For example, bank 1 (–), bank 1 (+), bank 2 (–).
XC_Charger_Owner.book Page 3 Friday, August 12, 2005 3:23 PM