


16
Charging the battery
Always keep one of the two batteries fully charged in the battery charger.
The typical charge time is four hours.
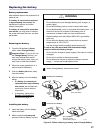
To charge a battery
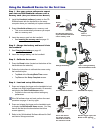
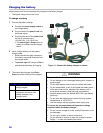
1 Connect the battery charger.
a Connect the power supply output to
the charger stand.
b Plug one end of the power cord into
the power supply.
c Plug the other end of the power cord
into an AC power source:
(100-240 Vac, 1.0A, 50-60 Hz).
The status light is Green when no
battery is inserted into the charger
stand.
2 Insert a single battery into the battery
charger stand.
Ensure that the two gold contacts on
the battery are placed face down into
the charger stand.
The status light will change to Red to
indicate that the battery is charging.
3 The status light changes from Red to
Green when the battery is fully charged.
702_004
Power
Supply
Battery
Power
Cord
Status
Light
Charger
Stand
1b
1a
1c
3
2
Figure 11: Connect the battery charger as shown.
Battery Charger Status Light
Red
indicates that the battery is
being charged.
Green
indicates that the battery is
charged or that there is no
battery inserted in the
charger stand.
WARNING
To reduce the risk associated with fire and explosion:
Do not attempt to use a damaged battery pack, charger, or
power supply;
Do not allow battery pack to come in contact with water;
Do not disassemble, crush, or incinerate the battery pack —
at the end of service life, dispose of the battery pack in
accordance to federal, state and local requirements;
Replace battery pack with Molicel MCR-1821 type battery
pack only;
Do not store the battery pack in areas that may exceed
temperatures of 100°C/212°F;
Use the charger with the supplied power supply only.
To reduce the risk associated with hazardous voltage
contained within the battery charger:
Do not use the charger or power supply if the case or cord
are damaged;
Do not use in outdoor or wet environments;
Do not attempt to service or repair the charger or power
supply — no user serviceable parts inside.