


Page 10 AMERICAN SANDERS TECHNOLOGY Apollo 8 Operator's Manual
DANGER: Sanding/finishing wood floors
can create an environment
that can be explosive. Ciga-
rette lighters, pilot lights and
any other source of ignition
can create an explosion when
active during a sanding ses-
sion. All sources of ignition
should be extinguished or
removed entirely if possible
from the work area.
DANGER: Work areas that are poorly
ventilated can create an
explosive environment when
certain combustible materials
are in the atmosphere, i.e.,
solvents, thinners, alcohol,
fuels, certain finishes, wood
dust and other combustible
materials. Floor sanding
machines can cause flam-
mable material and vapors to
ignite. Read the manufac-
turer's label on all chemicals
used to determine combustibil-
ity. Keep the work area well
ventilated.
DANGER: Sanding dust can spontane-
ously ignite and cause an
injury or damage. Sanding
dust should be disposed of
properly. Always empty the
sanding dust into a metal
container. Remove the con-
tents of the dust bag when the
bag is 1/3 full.
DANGER: Sanding dust can spontane-
ously ignite and cause an
injury or damage. Remove the
contents of the dust bag each
time you finish using the
machine. Always dispose of
the dust in a metal container
located outside of the building.
Never leave a dust bag unat-
tended with sanding dust in it.
Do not empty the contents of
the dust bag into a fire.
DANGER: Hitting a nail while sanding
can cause sparks and create
an explosion or fire. Always
use a hammer and punch to
countersink all nails before
sanding floors.
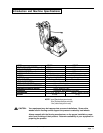
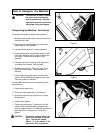
How to Operate the Machine
To operate the machine follow this procedure:
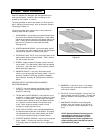
1. Before sanding, decide on best approach for
sanding desired area. If the floor is uneven, it
may be necessary to sand diagonally to the
direction that the floor is laid. This will help
"pull" or stretch low and high spots in the floor
over a greater area, producing a flatter surface.
When sanding the area, work in a way so that
you are moving away from where the cord set
enters the room. This will help to avoid entangle-
ment with the cord set and eliminate the need to
move the cord set out of the way so frequently.
Work the area in a way that avoids interruption or
termination points ( an end of pass.) Make long
continuous passes.
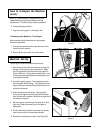
2. Swing cable arm to side of machine opposite the
direction you intend to work. Rotate elbow on
dust pipe until dust bag rest on motor. This will
maintain balance and sanding pressure as the
dust bag fills. The machine should be operated
with the dust bag in this position whenever
possible.
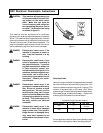
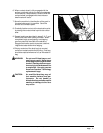
3. Install the operating belt as follows:
a. Position the operating belt around waist.
b. Cross the straps at the waist. See figure #9.
c. Slide the belt loop end over the handle on the
control lever side. Adjust the length as
needed.
d. Wrap the remaining strap around the oppo-
site side of the handle and hold it in place
with your hand.
WARNING: Serious operator injury could
occur if the operator has tied or
strapped the loose end of the
operator's belt strap to the ma-
chine. Always wrap the strap so
that you can let go and get away
quickly in case of bag fire or
explosion.
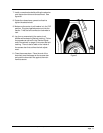
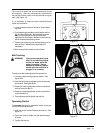
4. Turn the control switch to the "On" position.
CAUTION: To prevent damage to the floor,
make sure the machine is in
motion when the contact wheel
is engaged with the floor.
5. Feather-cut in by easing the contact wheel down
onto the surface with the control lever while the
sander is in motion.