


-6-
Initial Operation
Protect the tool against
moisture and direct sun
irradiation.
Do not subject the tool to extreme
temperatures or variations in temperature.
As an example, do not leave it in vehicles for
longer periods. In case of large variations in
temperature, allow the tool to adjust to the
ambient temperature before putting it into
operation. In case of extreme temperatures or
variations in temperature, the accuracy of the
tool can be impaired.
Avoid heavy impact or falling of the tool.
After heavy exterior impact on the tool, an
accuracy check should always be carried
out before continuing to work (see “Leveling
Accuracy”). Do not use the tool when the laser
emitting cover has been damaged after heavy
exterior impact on the tool. Many accidents are
caused by poorly maintained tools.
Switch the tool off during transport. When
switching off, the leveling unit, which can be
damaged in case of intense movement, is
locked.
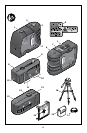
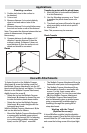
Switching On and Off
To switch on the tool, slide the On/Off switch
4 upward so that “I” is indicated on the switch.
Immediately after switching on, the tool sends a
laser beam out of each exit opening 1.
Do not point the laser beam at persons or
animals and do not look into the laser beam
yourself, not even from a large distance.
To switch off the tool, push the On/Off switch
4 downward so that “0” is indicated on the
switch. When switching off, the leveling unit is
locked.
Setting the Automatic Switch-off
By default, the tool automatically shuts off
20 minutes after being switched on. The
automatic switch-off can be set from 20 minutes
to 8 hours. For this, switch the tool on, then
immediately off, and then on again within 4
s. To confirm the change, all laser beams
will flash quickly for 2 s after switching on the
second time.
Do not leave the switched on tool
unattended and switch the tool off after
use. Other persons could be blinded by the
laser beam. When switching on the tool the
next time, the automatic switch-off is set to
20 minutes again.
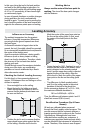
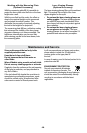
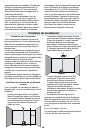
Working with Automatic Leveling
Position the tool on a level and firm support,
attach it to the holder 8 or to the tripod 18.
After switching on, the automatic leveling
function automatically compensates
irregularities within the self-leveling range from
±5° (longitudinal axis) and ±3° (lateral axis). The
leveling is finished as soon as the laser points
do not move any more.
If the automatic leveling function is not possible,
e.g. because the surface on which the tool
stands deviates by more than 5° (or 3° from the
horizontal plane) the laser beams flash rapidly.
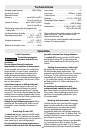
Working range (typical) ......... 100 ft (30m)
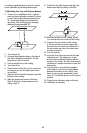
Leveling Accuracy
Minimum Factory
Accuracy ...............up to 1/8-in at 30 ft
(up to 3 mm/10 m)
Typical Accuracy ........ up to 1/16-in at 30 ft
(up to 2 mm/10 m)
Self-leveling range (typical) alongside the:
– lateral axis ......................... ±3°
Leveling duration, typically ............. <3s
Operating temperature ........ 14 °F... 104 °F
(–10 °C ... +40 °C)
Storage temperature ......... -4 °F... 158 °F
( –20 °C ... +70 °C)
Relative air humidity, max. .............90 %
Laser class ........................... 2
Laser type ................635 nm, <1 mW
Tripod mount ......................1/4-20
Batteries ................3 x 1.5 V LR6 (AA)
Operating lifetime, approx. ..............24 h
Weight .....................0.5lb (0.25kg)
Dimensions ...........4-1/8” x 3-1/8” x 1-5/8”
(105 x 80 x 42 mm)
Please observe the article number on the type
plate of your tool. The trade names of the
individual tools may vary.
The tool can be clearly identified with the serial
number 7 on the type plate.
Technical Data
Operation
!
WARNING