


Funcionamiento
(Continuación)
CUCHILLAS
Quite el material de AMBAS caras
o ladosde la mayoría de las cuchillas.
Trabaje desde el extremo pesado (grueso)
de las cuchillas hacia la punta.
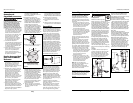
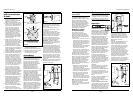
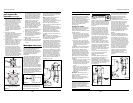
DESTORNILLADORES (PLANOS)
El extremo de un destornillador
correctamente afilado formará
un borde parejo y perfecto,
plano yperpendicular al mango del
destornillador. Sostenga cada cara del
destornillador contra al rueda de la
rectificadora de banco. Mueva el
extremo de forma recta contra la rueda
para rectificarlo correctamente. Al igual
que con toda operación en la que deba
colocar un objeto directamente en la
rueda abrasiva, TENGA CUIDADO y
tómese su tiempo. NO se apure.
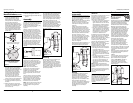
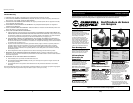
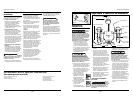
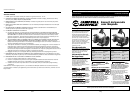
BROCAS DE TALADRO
La MEJOR forma de afilar las brocas de
taladro es utilizando un marco para
afilar (disponible en la mayoría de las
ferreterías), pero se pueden dejar
“más elegantes” con su rectificadora
de banco. Coloque la broca en la ranura
del apoyo para la pieza de trabajo en el
lado derecho. Mientras sostiene
firmemente la broca, desplácela hacia
adelante hasta hacer contacto con la rueda
abrasiva. Gire lentamente la broca en
sentido horario para afilar toda la punta
de la broca. Esta técnica exige cierta
paciencia, tómese su tiempo y
practique algunas veces para sentirse
cómodo. Asegúrese de mantener el
ángulo original de la cabeza de la
broca – esto es muy importante para la
futura eficiencia de la broca de taladro
(vea la figura 8).
Diagnóstico
y resolución
de problemas
Si bien su nueva rectificadora de banco
es muy fácil de operar, si tiene
problemas, verifique lo siguiente:
1. La rectificadora no enciende
Verifique que haya corriente en
el tomacorriente; pruebe con
un electrodoméstico; verifique
las conexiones del enchufe;
corrija yajuste las conexiones
defectuosas; verifique el fusible;
si noestá seguro reemplácelo con
la clasificación correcta.
2. La rueda oscila o vibra
Verifique que la contratuerca esté
ajustada. Verifique que la rueda esté
correctamente ubicada en el eje
y laarandela de posición. Si se ejerció
demasiada presión o la rueda se
“atascó”, puede estar dañada,
haciendo que vibre. Si hay pruebas
de que la rueda está dañada, no la
use, quítela y reemplácela por una
nueva. Deseche las ruedas viejas con
cuidado.
3. La rueda deja terminaciones
brutas.
Demasiada presión en la rueda
puede hacer que la terminación
de lasuperficie sea insuficiente.
Si trabaja con aluminio o una
aleación blanda similar, la rueda se
obstruirá pronto y no rectificará
correctamente.
No se
recomienda rectificar aluminio ni
aleaciones blandas similares. Obstruirán
la rueda y posiblemente causen daños
ala rectificadora o lesiones al usuario.
Esta rectificadora de banco no tiene
otras piezas que necesiten servicio
por parte del usuario.
Entretien
El servicio de la herramienta debe
ser realizado sólo por personal de
reparaciones calificado. El servicio
o mantenimiento realizado por
personas no calificadas puede
provocar riesgo de lesiones.
Desconecte la rectificadora antes
de darle mantenimiento, limpieza,
de cambiar las ruedas abrasivas,
u operaciones parecidas.
Si la herramienta no enciende o no
funciona correctamente, devuelva la
herramienta a una instalación de
servicios para repararla.
Limpieza
Mantenga la rectificadora limpia para
lograr el funcionamiento más eficiente
y sin peligros. Con la rectificadora
desconectada y las gafas de seguridad
puestas, limpie todo material extraño
alrededor del interruptor y limpie toda
la rectificadora con un chorro de aire
comprimido. No intente limpiarla
introduciendo objetos con punta a
través de las aberturas. Mantenga las
protecciones para los ojos de la
herramienta limpias, secas y libres de
aceite o grasa. Use únicamente un
jabón suave y un paño húmedo para
limpiar la herramienta, evitando todos
los contactos eléctricos.
Ciertos agentes de limpieza y solventes
son nocivos para los plásticos y otras
piezas aisladas. Algunos de éstos
incluyen gasolina, aguarrás, solvente
para laca, solvente de pintura,
solventes de limpieza con cloro,
amoníaco y detergentes de uso
doméstico que contengan amoníaco.
Nunca use solventes inflamables ni
combustibles cerca de las
herramientas.
SERVICIO TÉCNICO
Para obtener información con relación
al funcionamiento o reparación
de esteproducto, sírvase llamar al
1-800-424-8936.
El servicio de la herramienta debe
serrealizado sólo por personal de
reparaciones calificado. El servicio
omantenimiento realizado por
personas no calificadas puede provocar
riesgo de lesiones.
Al realizarle un servicio a la herramienta,
utilice únicamente piezas de repuesto
idénticas. Siga las instrucciones de la
sección Mantenimiento de este manual.
El uso de piezas no autorizadas o
el noseguir las instrucciones de
Mantenimiento puede crear un riesgo
de choque eléctrico o lesión.
30 Sp
Figura 8
Manual de Instrucciones
General Safety
Information (Cont’d.)
PERSONAL SAFETY
Do not
misuse
this product. Excessive exposure to
vibration, work in awkward positions,
and repetitive work motions can cause
injury to hands and arms. Stop using any
tool if discomfort, numbness, tingling, or
pain occur, and consult a physician.
1. Stay alert, watch what you are doing,
and use common sense when
operating a power tool. Do not use
tool while tired or under the influence
of drugs, alcohol, or medication. A
moment of inattention while
operating power tools may result in
serious personal injury.
Avoid
accidental starting. Be sure switch is in
the OFF position before making any
adjustments, changing accessories, or
storing the tool. Carrying tools with
your finger on the switch or with the
switch on invites accidents.
2. Remove adjusting keys or wrenches
before turning on the tool. Form a
habit of checking to see that keys and
adjusting wrenches are removed from
tool before turning it on. A key or
wrench attached to a rotating part of
the tool may result in personal injury.
3. Do not overreach. Keep
proper footing and
balance at all times.
Proper footing and
balance enable better
control of the tool in unexpected
situations.
4. Always work in a well-
ventilated area. Wear an
OSHA-approved dust
mask and safety glasses.
5. Keep hands away from rotating parts.
6. Secure work. Use clamps or a vise to
hold work when practical. It’s safer
than using your hand and it frees both
hands to operate tool.
7. Always use correct size wheels and
made for your grinder. Wheels that
do not match the mounting
hardware will run eccentrically,
causing great risk or injury to the
user and damage to the tool.
8. Never stand on tool. Serious injury
could occur if the tool is tipped or if
the tool is unintentionally
contacted.
9. Never leave tool running
unattended. Turn power off. Don’t
leave tool until it comes to a
complete stop.
TOOL USE AND CARE
Do not
use tool
if switch does not turn it on or off. Any
tool that cannot be controlled with the
switch is dangerous and must be
repaired.
1. This tool must NOT be modified or
used for any application other than
that for which it was designed.
Do not
force the
tool. The correct tool will do the job
better and safer at the rate for which it is
designed. Use the right tool for your
application. Don’t force tool or
attachment to do a job for which it was
not designed.
2. Check for misalignment or binding
of moving parts, breakage of parts,
and any other condition that may
affect the tool’s operation. If
damaged, have the tool serviced
before using. Many accidents are
caused by poorly maintained tools.
3. Use only accessories that are
recommended by the manufacturer
for your model. Accessories suitable
for one tool may create a risk of
injury when used on another tool.
4. Store tools out of reach of children
and other untrained persons. Tools
are dangerous in the hands of
untrained users.
Safety Rules for
Bench Grinders
1. KEEP GUARDS IN PLACE and in
working order. Doing so will
protect the operator against flying
debris and injury in case the wheel
breaks.
2. Check the wheel for cracks and
chipped edges before mounting
and/or running tool. Cracked
wheels should never be used and
should be replaced. To check the
integrity of the grinding wheel,
stand away from the front of the
wheel and run the grinder for more
than one minute to test it. Replace
if you note anything abnormal.
Then test new wheel for more than
3 minutes.
3. Use only the face of a straight
wheel and the side of a cup wheel
when grinding. Avoid sudden feeds
of work into wheel to minimize the
possibility of cracks or breakage.
4. Let the grinding wheel come up to
full speed after switching the tool
on and BEFORE you start to use the
grinder.
5. Replace cracked, chipped or
damaged wheels immediately.
3
www.chpower.com
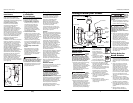
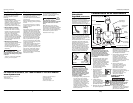
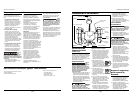
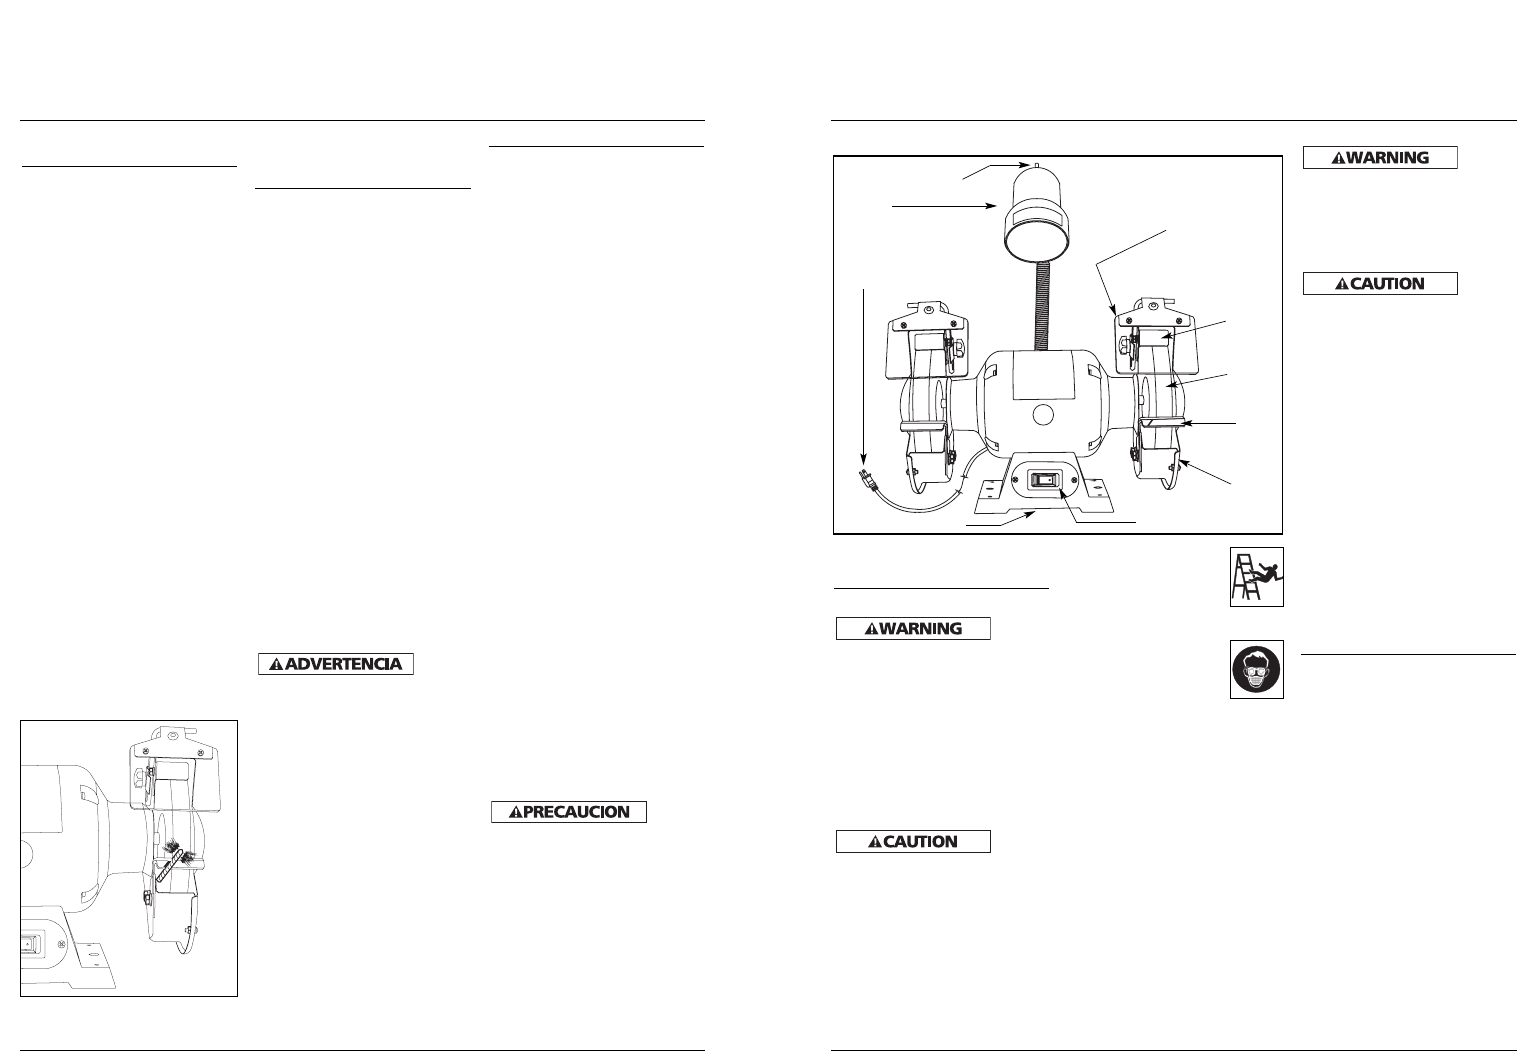
DG490500CK, DG490700CK
Power Cord
Lamp
Lamp ON/OFF Switch
Eye Shields
Spark
Arrester
Grinding
Wheel
Work
Rest
Wheel
Guard
Base
Power Switch
Figure 3
Getting to know your Grinder