


14
Operating Instructions and Parts Manual
www.chpower.com
Operation (Continued)
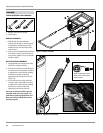
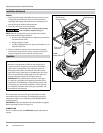
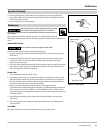
RAPID INFLATION TECHNOLOGY™ (RIT)
When the compressor is used in the RIT mode, the air being produced from the
compressor pump will go directly to the recoil hose which is attached to the bottom of
the compressor (See Figure 15). This will eliminate waiting for the compressor tank to
fill up, allowing for significantly faster inflation.
Instant air hose will get hot while the compressor is
on and during the inflation process.
Drain water from tank prior to inflation.
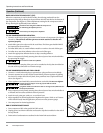
TO USE COMPRESSOR FOR INFLATION:
1. Connect recoil hose to open port located on the bottom of compressor (See Figures
10 and 15). The coil hose and blow gun must remain attached so that the unit
operates properly.
2. Attach blow gun to the other end of the recoil hose. The blow gun should ALWAYS
be connected to the recoil hose.
3. To inflate balls, rafts, etc. attach inflation needle or nozzle to the end of blow gun.
4. To inflate tires, attach tire inflation valve to the end of blow gun.
5. Attach the appropriate inflation device to object needing inflation.
6. Turn on compressor by firmly pressing down the red power foot switch and inflate
by squeezing the trigger.
Use caution to avoid over inflation.
7. When inflation is complete, blow gun can be attached to the clip that is molded on
the side of the top shroud for convenient storage.
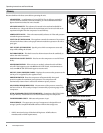
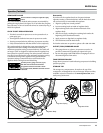
TO USE COMPRESSOR FOR AIR TOOL USAGE:
1. Connect 1/4 inch industrial plug to separate hose (plug and hose not included).
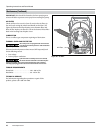
2. Connect separate hose to the coupler located below pressure regulator by pulling
the sleeve on coupler all of the way back, then push hose into coupler and release
sleeve (See Figure 17).
3. Close regulator (turn knob fully counterclockwise to the left). Do not over tighten.
If outlet pressure gauge is at zero (0) psi, DO NOT turn knob
counterclockwise.
If regulator knob is turned and a “click” is no longer heard, DO NOT turn
knob counterclockwise.
4. Turn compressor on by firmly pressing down the red power foot switch and allow it
to fill tank until it reaches automatic shut off pressure.
5. Attach air tool, paint gun, nailer, etc. to end of air hose.
6. Adjust regulator for desired application. Regulator has preset “click-to-set” feature
which should closely match application pictures on outlet pressure gauge.
7. Use compressor for desired application.
END OF OPERATION/STORAGE
1. Turn compressor OFF at foot pedal ON/OFF switch.
2. Unplug power cord from wall outlet and attach to clip that is molded on the side of
the top shroud.
3. Drain tank of condensation as outlined in the Drain Tank section below.
Figure 15 - Rapid Inflation Technology
Figure 16
Figure 17 - Attach hose to coupler