


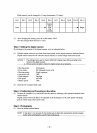

Flash intensity can be changed
in
11
steps (increments:
1/3
steps).
DA 1
DA2 DA3
DA4
DA5
DA6 DA7
DA8 DA9
DA10
DA
11
Equival-
ent to
Dark
E08
~
Bright
-
~
D30
180400
(3) After changing the setting, press the switch under "RTN".
Now the changed flash intensity is valid.
Step 3 Setting the digital camera
By referring to the manual
of
the digital camera, set it as indicated below.
(1) With the retinal camera
in
eye front observation mode, set the digital camera as indicated below.
Digital camera cannot be set when the retinal camera is
in
retinal image observation mode.
NOTES:
1.
The settings beloware for Canon EOS 030. Display
may
differaccording to the
model
of
the digital camera.
2. Picture cannot
be
taken unless the digital camera is
set
properly.
• Shooting mode:
• Focus mode:
• Shooting mode:
• Auto power off:
• White balance:
• ISO speed:
• Shutter speed:
M (manual)
MF (Manual Focus) or M
Single exposure
OFF
Daylight
ISO
400
1160
(2) Insert the
CF
(compact flash) card.
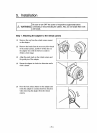
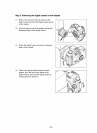
Step 4 Positioning and Focusing on the retina
(1) Position the examinee's eye and focus onto the retina by referring to the operation manual
of
the
retinal camera.
Digital camera will not be able to be operated as all the displays on the LDC panels will disap-
pear in retinal image observation mode.
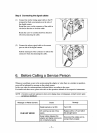
Step 5 Photography
(1) Press the shutter release button.
NOTE: It
may
take 1 to 2 seconds forthe strobe tube to flash afterpressing the shutter release
button when photographyis performedcontinusouly.
-4-