


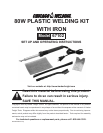

Page 7SKU 67102 For technical questions, please call 1-800-444-3353.
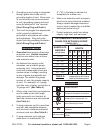
SPECIFICATIONS
Electrical Requirements 120 V~ / 60 Hz
Max. Temperature 525° F
Power Cord 18-AWG x 2C
UNPACKING
When unpacking, check to make sure
that the item is intact and undamaged. If
any parts are missing or broken, please
call Harbor Freight Tools at 1-800-444-
3353 as soon as possible.
OPERATING INSTRUCTIONS
Read the ENTIRE IMPORTANT
SAFETY INFORMATION section
at the beginning of this manual
including all text under
subheadings therein before set
up or use of this product.
Tool Set Up
TO PREVENT
SERIOUS INJURY
FROM ACCIDENTAL
OPERATION: Unplug the tool
from its electrical outlet and
allow it to cool before
performing any inspection,
maintenance, or cleaning
procedures.
Work Piece and Work Area Set Up
Designate a work area that is clean 1.
and well-lit. The work area must not
allow access by children or pets to
prevent distraction and injury.
Route the power cord along a safe 2.
path to reach the work area without
creating a tripping hazard or exposing
the power cord to possible damage.
The power cord must reach the work
area with enough extra length to
allow free movement while working.
Secure loose workpieces using a vise 3.
or clamps (not included) to prevent
movement while working.
There must not be hazardous 4.
objects, such as utility lines or foreign
objects, nearby that will present a
hazard while working.
General Operating Instructions
Note:1. It is recommended that you
material.
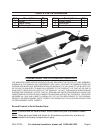
Plug the Power Cord (6) of the tool 2.
into a 120 volt, grounded, electrical
outlet.
Allow Welder (1) to pre-heat for 5 3.
to 10 minutes before use. Prep the
surface by sanding off excess paint,
or, if necessary, grinding surface to
add texture.
4.
apply the Welder’s tip to the end of
a Repair Stick (2) and melt the Stick
onto the work surface.
Melt and spread the Repair Stick over 5.
cracked or damaged area. Use edge
of welding tip to melt off any excess
plastic.
WARNING!6. Be careful to not melt
base material area during use.
Once the melted area cools (apply 7.
cold water to speed up cooling), sand
REV10j