


SKU 94488 For technical questions, please call 1-800-444-3353 PAGE 11
ASSEMBLY INSTRUCTIONS
CAUTION! Make sure to wear ANSI-approved safety impact eyeglasses when
performing any assembly of the Cut Off Saw. Also, when installing or replacing the
Saw Blade (23F) (not included) wear heavy duty work gloves to avoid accidental
cuts to the hands and fingers.
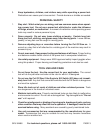
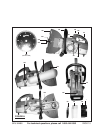
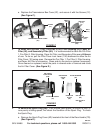
To Install A Saw Blade:
Make sure to refer to the “SAW BLADE PRECAUTIONS” section on page 6 of
this manual to select the correct size and type of Saw Blade to install in the Cut
Off Saw.
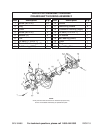
Press down on the Shaft Lock (34F) to hold the Blade Shaft (16F) in position.
(See Figure A.)
Loosen and remove the Hex Bolt (25F). Then, remove the Washer (24F) and outer
Flange (22F). (See Figure A.)
Mount the new Saw Blade (23F) on the Blade Shaft (16F). IMPORTANT: Make
sure the arrow shown on the Saw Blade points in the same direction as the arrow
shown on the Blade Guard (19F). (See Figure A.)
Once the Saw Blade (23F) is mounted on the Blade Shaft (16F), replace the outer
Flange (22F) and Washer (24F). Then, firmly tighten the Hex Bolt (25F) to secure
the Saw Blade in place. (See Figure A.)
Make sure to check the Blade Guard (19F) for proper operation. If necessary, loosen
the Blade Guard Positioning Knob (38F) to adjust the Blade Guard (19F) position.
Never disable the Guard. Do not use the Cut Off Saw if the Guard assembly does
not operate properly. Before each use, make sure the Blade Guard does not touch
the Saw Blade. (See Figure A.)
PRE-START INSTRUCTIONS
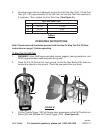
To Fill The Fuel Tank:
WARNING! Your Warranty is voided if: You do not operate the Cut Off Saw with
the proper 50:1 fuel mix in its Fuel Tank. Never run the Engine with an improper
fuel mix, low or no fuel mix. Running the Engine with an improper fuel mix, low or
no fuel mix will permanently damage the unit.
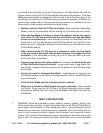
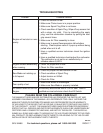
To obtain the proper 50:1 fuel mix, combine two cycle oil with unleaded gasoline
(minimum 91 octane rating) in a clean, approved container. Cover and shake to
thoroughly mix before each fueling. Refer to the Chart below for proper mix quanti-
ties. NOTE: Mix only enough fuel for a few days work. The maximum storage time
of mixed fuel is 3 months. (See Table A.)
1.
2.
3.
4.
5.
6.
1.
2.