


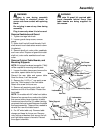

21
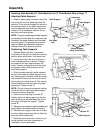
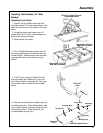
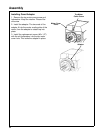
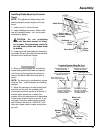
1. Pull motor/carriage to end of arm and
lock the rip lock. Rotate motor to out-rip posi-
tion.
2. On the rear of the motor is located the
motor support cap. Remove this cap. A small
screwdriver will assist you in removal of this
cap. (This cap is not on all models)
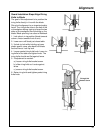
3. Using a 3/4" socket, short extension and
ratchet remove nut and washer from motor
support. Take care not to drop washer from
motor support. Take care not to drop washer
during removal, it could become lodged
between motor housing and motor. Slide
motor off yoke and position out of way.
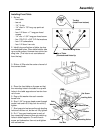
4. Using a #2 Phillips screwdriver, remove
two pan head cross screws from motor side
of handle assembly. Discard handle and 2
screws.
5. Using a #2 Phillips screwdriver, remove
two pan head cross recess plastite no. 8 x 1
inch long screws from motor side of yoke
assembly that hold the yoke cover in place.
NOTE: Some models are clipped in place.
Use a flat blade screwdriver to push the clips
through from the motor side of the yoke.
6. Using a 5/16" box wrench or Phillips
screwdriver remove one screw type “T”
10-32 x 1/2 from the bevel spring located
in front of the yoke assembly.
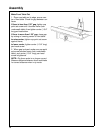
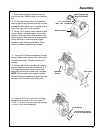
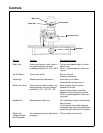
Motor Support Cap
(Not on all models)
1/2 x 13 Lock Nut
.505 x 7/8 x 1/16 Washer
Motor Assembly
Yoke Cover
#8 Plastite
Screws
Bevel Spring
10-32 Hex Head Screw
or 10-32 Pan Head Screw
Assembly