


BEVELRiPPiNG
Thiscutisthesameasa ripcutexceptthebladebevel
angleissettoanangleotherthan"0".
[_ WARNING I
Cut only with the workpiece and the fence on the
right side of the blade.
[A wARNI.eI
Never attempt to pull the workpiece backwards
during a cutting operation. This will cause kickback
and serious injury to the user can occur.
RiPPiNG SMALL PIECES
[A WARNINGI
Avoid injury from the blade contact. Never make
through=saw cuts narrower than 314 in. wide.
1. tt is unsafe to rip small pieces. Instead, rip a larger
piece to obtain the size of the desired piece.
2. When a small width is to be ripped, your hand cannot
be safely put between the blade and the rip fence,
therefore, use one or more push sticks to pass the
workpiece completely through and past the blade.
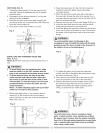
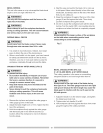
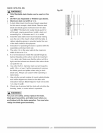
CROSSCUTTING 90 ° MITER ANGLE (FIG. Z)
IA WARNINGI
To prevent serious injury:
= Do not allow familiarity or frequent use of your
table saw to cause careless mistakes. Remember
that even a careless fraction of a second is
enough to cause a severe injury,
• Keep both hands away from the blade and the
path of the blade.
• Never attempt to pull the workpiece backwards
during a cutting operation. This will cause
kickback and serious injury to the user can
occur.
1. Remove the rip fence and place the miter gauge a
miter gauge groove on the table.
2. Adjust the blade height so it is 1/8 in. higher than the
top of the workpiece.
3. Hold the workpiece firmly against the miter gauge
with the blade path in line with the desired cut
location. Move the workpiece to one inch distance
from the blade.
4. Start the saw and wait for the blade (1) to come up
to full speed. Never stand directly in line of the saw
blade path, but always stand to the side of the blade
that you are cutting on.
5. Keep the workpiece (2) against the face of the miter
gauge (3) and flat against the table. Then slowly
push the workpiece through the blade.
6. Do not try to pull the workpiece back with the blade
turning. Turn the switch OFF, and carefully slide the
workpiece out when the blade is completely stopped.
IA WARNINe!
Always position the larger surface of the workpiece
on the table when crosscutting and/or bevel
crosscutting to avoid instability.
Fig. Z
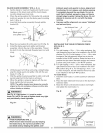
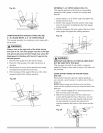
BEVEL CROSSCUTTING (FIG. AA)
0o~45° BLADE BEVEL & 90° MITER ANGLE
This cutting operation is the same as crosscutting
except the blade is at a bevel angle other than 0°
IA WARNINGI
Always work to the right side of the blade during
this type of cut. The miter gauge must be in the right
side groove because the bevel angle may cause the
blade guard to interfere with the cut if used on the
left side groove.
1. Adjust the blade (1) to the desired angle, and tighten
the blade bevel lock knob.
2. Tighten miter lock handle (2) at 90°.
3. Hold workpiece (3) firmly against the face of the miter
gauge throughout the cutting operation.
19