


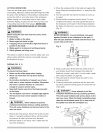

Fig,AA
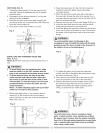
COMPOUND MITER CROSSCUTTING (FIG. BB)
0°~45 ° BLADE BEVEL & 0o~45 ° MITER ANGLE
This sawing operation is combining a miter angle with a
bevel angle.
[A WARNINGI
Always work to the right side of the blade during
this type of cut, The miter gauge must be in the right
side groove because the bevel angle may cause the
blade guard to interfere with the cut if used on the
left side groove,
1. Set the miter gauge (3) to the desired angle.
2. Place the miter gauge in the right side groove of
the table.
3. Set the blade (1) bevel to the desired bevel angle
and tighten the blade bevel lock knob.
4. Hold workpiece firmly against the face of the miter
gauge throughout the cutting operation.
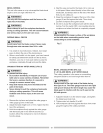
Fig, BB
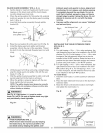
MiTERiNG 00~45° MITER ANGLE (FIG, CC)
This sawing operation is the same as crosscutting
except the miter gauge is locked at an angle other
than 90°.
1. Set the blade (1) to 0° bevel angle and tighten the
blade bevel lock knob.
2. Set the miter gauge (3) at the desired miter angle
and lock in position by tightening the miter gauge
locking handle.
3. Hold the workpiece (2) firmly against the face of the
miter gauge throughout the cutting operation.
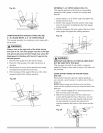
Fig, CC
IA WARNlaGI
ABRASIVE AND METAL CUTTING BLADES MUST
NOT BE USED WiTH THIS SAW
This saw was not made to cut metals or masonry
materials. Doing so may result in injury, tt will also void
the warranty.
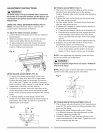
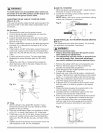
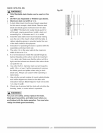
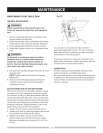
USING WOOD FACING ON THE RiP FENCE
(FIG, DD)
When performing some special cutting operations,
you can add a wood facing (1) to either side of the rip
fence (2).
NOTE: Before using wood facing on the rip fence,
make sure the auxiliary fences are lowered flush to the
table top.
1. Use a smooth straight 3/4 in. thick wood board (1)
that is as long as the rip fence.
2. Attach the wood facing to the fence with wood
screws (3) through the hole in the fence. A wood
fence should be used when ripping material such
as thin paneling to prevent the material from
catching between the bottom of the fence and the
table.
3
1 ---------2
2O