


2,
2,
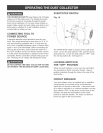
DO NOT assemble the Dust Collector until you are
sure the tool IS NOT plugged in,
DO NOT assemble the Dust Collector until you are
sure the power switch is in the "OFF" position,
For your own safety, DO NOT connect the machine
to the power source until the machine is completely
assembled and you read and understand the entire
Owner's Manual,
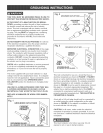
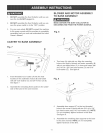
CASTER TO BASE ASSEMBLY
Fig. 7
B
A
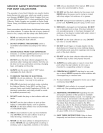
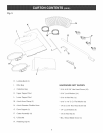
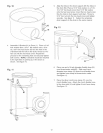
BLOWER AND MOTOR ASSEMBLY
TO BASE ASSEMBLY
MAKE CERTAIN THE DUST COLLECTOR iS
DISCONNECTED FROM THE POWER SOURCE.
A
B
B
D E
1,
Turn base (A) right side up, Align the mounting
hobs at the base of blower and motor assembly (B)
with six pre-drilled hobs (C) in base and fasten with
six 5/16=18 x 5/8" hex head screws (D) and 5/16"
lock washer (E), See figure 8,
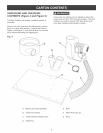
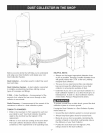
2,
insert threaded rod of caster (A) into the hob
located on the underside of base (B) and fasten
with 3/8" lock=washer (C) and 3/8-16 hex nut (D),
See figure 7,
Assemble the remaining three casters to the under-
side of the base in the same manner,
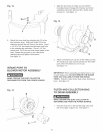
Fig. 9
G
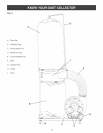
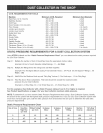
2,
3,
Assemble drum support (F) to the two threaded
hobs in the corner of base with two 5/16=18 x 5/8"
hex head screws and 5/16" lock washer (G), NOTE:
Do not completely tighten hardware at this time,
See figure 9,
Assemble the remaining drum supports to the base
in the same manner, NOTE: Do not completely
tighten hardware at this time,
11