


19
67098 Final
2-18-08
18
OPERATION cont.
Ways to Help Prevent Kickback cont.
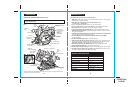
3. Inspect the workpiece for knots or nails before cutting. Never saw into a knot or nail.
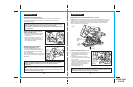
4. DO NOT cut warped or wet lumber. (see Fig. 5a)
5. ALWAYS support large panels to minimize the risk of blade pinching and Kickback. Large
panels tend to sag under their own weight (see Fig. 5a). Supports MUST be placed under
the panel, one near the line of cut and one near the edge of the panel (see Fig. 5).
6. When restarting the saw in the workpiece, CENTER the blade in the kerf and check to be
sure that the saw teeth are not engaged into the material. If the saw blade is binding, it may
walk up or Kickback from the workpiece when the saw is restarted.
7. DO NOT use a dull or damaged blade. Unsharpened, improperly set, or gummed-up blades
produce narrow kerf which causes excessive friction, blade binding and Kickback.
8. USE EXTRA CAUTION when making a “Pocket Cut” into existing walls or other blind areas.
The protruding blade may cut objects that can cause Kickback.
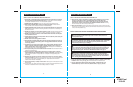
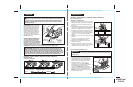
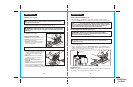
9. KEEP the blade at the correct depth setting. The depth setting should not exceed 1/4-inch
below the material being cut (see Fig. 6a). BE SURE that the blade depth and adjusting
locking levers are tight and secure BEFORE making a cut. If blade adjustment shifts while
cutting it may cause binding and Kickback.
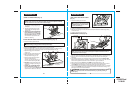
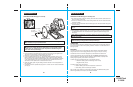
REMOVING BATTERY PACK FROM
CIRCULAR SAW (Fig. 7)
Fig. 7
!
Always remove battery
pack from your saw when you are
assembling parts, making adjustments,
assembling or removing blades,
cleaning, or when not in use. Removing
battery pack will prevent accidental
starting that could cause serious
personal injury.
WARNING:
1. Locate latches on sides of battery pack and
depress. Pull back on battery pack while
depressing latches to release battery pack
from saw.
OPERATION cont.
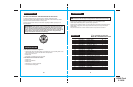
1. Charge battery pack only with the
charger/transformer that was supplied with
this saw, or one of the other chargers listed
on page 6.
2. Make sure power supply is normal household
voltage, 120 volts, 60 Hz, AC-only.
3. Connect battery charger’s transformer to
power supply.
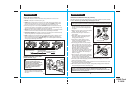
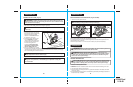
4. Place battery pack in charging stand. Align
raised rib on battery pack with groove in
charging stand (See Fig. 8).
5. Press down on battery pack to be sure
contacts on battery pack engage properly
with contacts in charging stand.
6. The charging stand has two (LED) indicator
lights, one green and one red (see Fig. 8a).
When the battery pack is put into the charging
stand, the red LED will light, indicating that
the battery pack is charging properly.
When the battery pack is charged and
removed from the charging stand, the red light
will go Off. The green LED will only come on
when there is a problem with the battery or
battery or charger.
7. After normal use, 3 hours or less of charging
time is required to fully recharge battery pack.
If battery pack is completely discharged,
6 hours or longer of charging time is required to fully recharge battery pack.
8. The battery pack will become slightly warm to the touch while charging. This is normal
and does not indicate a problem.
9. Do not place the battery charging stand / transformer in an area of extreme heat or cold.
It will work best at normal room temperature.
10. When battery pack becomes fully charged, unplug battery charging stand / transformer
from power supply and remove the battery pack.
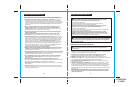
Fig. 8
Fig. 8a
Red
LED
Red
LED
Charging Stand
Transformer
CHARGING THE BATTERY PACK (Fig. 8 and 8a)
The battery pack for this tool has been shipped in a low charge condition to prevent possible
problems. Therefore, you should charge overnight prior to use.
NOTE: Batteries will not reach full charge the first time they are charged. Allow
several cycles (operation followed by recharging) for them to become fully charged.
Green
LED
NOTE: Within the warranty period, if the charging stand LED lights do not operate
properly, or the charging stand does not charge the battery pack, return the
charging stand / transformer and battery pack to your nearest Sears Store or other
Craftsman outlet for free replacement.
Fig. 6a
KICKBACK
Blade is Set Too Deep
Correct Blade Depth
(Should not exceed 1/4-in. below work piece)