


21
67098 Final
2-18-08
20
OPERATION cont.
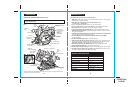
CHARGING A HOT BATTERY PACK
When using your tool continuously, the batteries in your battery pack will become hot.
You should let a hot battery pack cool down for approximately 30 minutes before
attempting to recharge.
NOTE: A hot battery pack only occurs when prolonged continuous use of your circular saw
causes the batteries to become hot. It does not occur with typical use. Within the warranty
period, if the battery pack becomes hot with typical use, return the charging
stand/transformer, and battery pack to your nearest Sears store or other Craftsman outlet
for free replacement.
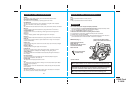
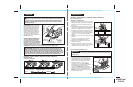
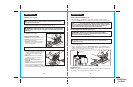
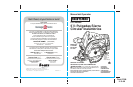
INSTALLING THE BATTERY PACK IN
CIRCULAR SAW (Fig. 9)
1. Place the battery pack in the saw, aligning
the raised rib on battery pack with groove
inside the saw.
2. Make sure the latches on each side of the
battery pack “snap” into place, and the
battery pack is secured in the circular saw
before beginning operation.
TRIGGER SWITCH WITH POWER
LOCK-OFF BUTTON (Fig. 10)
To turn the saw ON, depress the power
lock-off button and depress the trigger switch.
The saw will stay ON as long as the trigger
switch is depressed.
To turn the saw OFF, release the trigger switch.
the power lock-off button will return tothe center
OFF position
!
When placing battery pack in the tool, be sure raised rib on
battery pack aligns with the bottom of the saw and latches into place properly.
Improper installation of the battery pack can cause damage to internal
components.
CAUTION:
!
Cordless Battery Tools are always in operating condition when
the battery pack is installed in the tool. Therefore the Power Lock Button should
always be in the center position, locking the power off, when the tool is not in use
or when you are carrying it at your side.
WARNING:
OPERATION cont.
WARNING:
Cordless Battery Tools are always in operating condition when the
battery pack is installed in the tool. Therefore the battery pack should be removed when
the tool is not in use or when you are carrying it at your side.
!
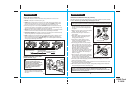
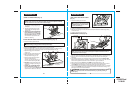
TO SET THE BLADE DEPTH (Fig. 11a)
1. Loosen the Depth Adjust Knob (see Fig. 11).
2. Locate the Depth-of-Cut Scale on the
Bracket located behind the blade guard
(see Fig. 11).
3. To determine the depth-of-cut, hold the
base of the saw flat, on and against the edge
of the workpiece.
4. Raise or lower the saw blade until the arrow
indicator mark on the back of the upper blade
guard aligns with the inch mark on the
Depth-Of-Cut Scale on the Bracket at your
desired depth (see Fig. 11a).
5. Tighten Depth Adjust Knob.
Arrow Indicator
Mark on the
back of blade
guard
MAKING DEPTH-OF-CUT ADJUSTMENTS (Fig. 11 and 11a)
ALWAYS use the correct blade depth setting. The correct blade depth setting for all cuts should
not be more than 1/4-inch below the material being cut (see Fig. 4). Allowing more depth will
increase the chance of kickback and cause the cut to be rough. Your saw is equipped with a
depth-of-cut scale to help obtain depth-of-cut accuracy. The depth-of-cut scale is located
on the inside back of the upper blade guard.
Fig.11
Bracket with
Depth-Of-Cut
Scale
To Raise
To Lower
Depth
Adjust
Knob
Base
Fig. 11a
Fig. 9
Fig. 10
Power
Lock-Off
Button
40
1
1
/
2”
1
”
30