


18
19
OPERATION cont. OPERATION cont.
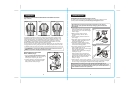
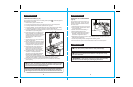
1. For normal drilling in wood, metal and plastics, turn and set the collar to the drilling
position symbol
2. For screw driving, turn and set the collar to the desired setting 1 through 23. If you are
not sure of the appropriate setting using the guidelines in the chart (Fig. 10b), above.
1 – 4 For driving small screws (least torque)
5 – 8 For driving screws into soft material
9 – 12 For driving screws into soft and hard materials
13 – 16 For driving screws in hard woods
17 – 23 For driving larger screws
For normal to heavy twist drilling into all building materials (most torque)
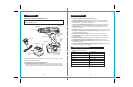
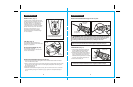
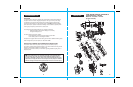
23 PLUS 1 ADJUSTABLE TORQUE CLUTCH (Fig. 10, 10a and 10b)
This drill / driver is equipped with an adjustable clutch that has 24 different torque settings.
These torque settings allow you to efficiently perform various drilling and screw driving
applications.
To adjust the clutch, hold the handle of the drill / driver with one hand and with the other hand
turn the clutch collar to the left or right (see Fig. 10), and line the desired setting (number or
symbol) up to the embossed arrow on the top of the drill / driver’s motor housing (see Fig. 10a).
Fig. 10
Fig.
10a
Use the following guidelines to arrive at a proper torque setting.
Fig. 10b
Decrease
Increase
To stop the drill /driver, release the trigger switch and the electric brake will stop the chuck
instantly. Ideal when driving screws, nuts and bolts.
Avoid running the drill /driver at low speeds for extended periods of time. Running at low
speeds under constant usage may cause the drill/driver to become overheated. If this
occurs, cool the drill /driver by running it without a load and at full speed.
NOTE: The drill / driver will not operate unless the Forward / Reverse Selector
Switch with Power Lock-Off is pushed fully to the left (forward) or to the right
(reverse).
ELECTRIC BRAKE
!
Do not hold the chuck body with one hand and use the power of the
drill / driver to tighten the chuck jaws on the accessory bit. The chuck body could slip in
your hand, or your hand could slip and come in contact with the rotating accessory bit.
This could cause an accident resulting in serious personal injury.
WARNING:
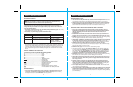
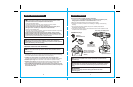
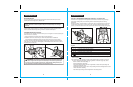
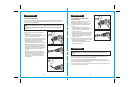
KEYLESS CHUCK (Fig. 9 and 9a)
The drill/driver has a keyless chuck which allows you to hand tighten or loosen accessory bits
without the use of a chuck key.
1. Grasp and hold the rear chuck collar with one hand (see Fig. 9).
2. Rotate the front of the chuck with your other hand, clockwise to CLOSE and
counterclockwise to OPEN the chuck jaws (as viewed from the front of the chuck).
The front of the chuck also has embossed “pointing hands”, indicating which direction to
rotate the front of the chuck to GRIP (tighten) or RELEASE (loosen) the accessory bits in
the chuck jaws (see Fig. 9a).
OPEN “RELEASE”
CLOSE “GRIP”
Fig. 9a
Fig. 9
®
• Set the collar to the lowest setting, “1”
• Drive and tighten the first screw
• If the clutch ratchets before the screw is tightened, increase the torque setting and
continue to tighten the screw.
• Repeat this process until you reach a torque setting that drives and tightens the screw
without the clutch ratcheting.
• Use that torque setting to drive and tighten the remaining screws.