


14
15
DESCRIPTION cont.
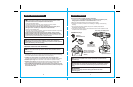
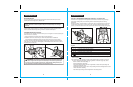
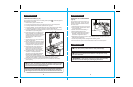
CHARGING THE BATTERY PACK (Fig. 4 and 4a)
The battery packs for these tools have been shipped in a low charge condition to prevent
possible problems. Therefore, you should charge overnight prior to use.
1. Charge battery pack only with the charger
that was supplied with this drill / driver.
2. Make sure power supply is normal
household voltage, 120 volts, 60 Hz,
AC-only.
3. Connect battery charger’s transformer to
power supply.
4. Place battery pack in charging stand. Align
raised rib on battery pack with groove in
charging stand (See Fig. 4).
5. Press down on battery pack to be sure
contacts on battery pack engage properly
with contacts in charging stand.
6. The charging stand has two (LED) indicator
lights, one green and one red.
When a battery pack is put into the stand
of the battery charger, the red LED will light,
indicating that the battery pack is charging
properly.
When the battery pack is charged and
removed from the charging stand, the red
light will go Off. The green LED will only
come on when there is a problem with the
battery or charger.
NOTE: Batteries will not reach full charge the first time they are charged.
Allow several cycles (operation followed by recharging) for them to become
fully charged.
NOTE: Within the warranty period, if the charging stand LED lights do not operate
properly, or the charging stand does not charge the battery pack, return the
battery charger and battery pack to your nearest Sears Store or other Craftsman
outlet for free replacement.
7. After normal use, 3 hours or less of charging time is required to fully recharge battery
pack. If battery pack is completely discharged, 6 hours or longer of charging time is
required to fully recharge battery pack.
8. The battery pack will become slightly warm to the touch while charging. This is normal
and does not indicate a problem.
9. Do not place battery charging stand/transformer in an area of extreme heat or cold.
It will work best at normal room temperature.
Fig. 4
Fig. 4a
Red
LED
Green
LED
Red
LED
OPERATION
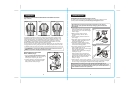
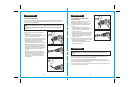
FORWARD / REVERSE SELECTOR SWITCH with POWER LOCK-OFF
(Fig. 3, 3a, 3b)
!
To prevent gear damage, always allow the chuck to come to a
complete stop before changing the direction of rotation.
CAUTION:
The direction of bit rotation is forward or reverse and is controlled by a selector switch
located above and to the rear of the trigger switch. When holding the drill / driver in the
normal operating position, (and viewed from the back of the drill/driver see Figs. 3, 3a
and 3b), the selector switch should be positioned (pushed) all the way to the LEFT,
for FORWARD or normal drilling / driving, and positioned (pushed) all the way to the
RIGHT for REVERSE to remove drill bits and back out screws.
The third position for the selector switch is located in the CENTER (Fig. 3b). This position keeps
the trigger switch from working, locking the power “OFF”. Setting the selector switch in the “OFF”
or CENTER position helps reduce the possibility of accidental starting when the tool is not in use.
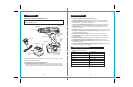
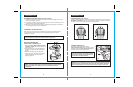
REMOVE BATTERY PACK FROM
DRILL / DRIVER (Fig. 4)
1. Place the Forward / Reverse Selector Switch
with Power Lock-Off into the center position to
lock the power off (see Fig. 3b, above).
2. Locate the latches on each side of the battery
pack. Depress (squeeze in) latches and pull
battery pack out of drill (see Fig. 4).
REVERSE
POWER LOCK-OFF
FORWARD
Fig. 3 Fig. 3a Fig. 3b
OPERATION cont.
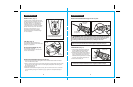
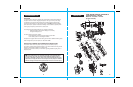
CHARGING THE BATTERY PACK (Fig. 5 and 5a)
The battery pack for this tool has been shipped in a low charge condition to prevent
possible problems. Therefore, you should charge overnight prior to use.
1. Charge battery pack only with the charging
stand / transformer that was supplied with
this drill / driver or one of the other chargers
listed on page 6.
2. Make sure power supply is normal
household voltage, 120 volts, 60 Hz,
AC-only.
3. Connect charging stand’s transformer to
power supply.
4. Place battery pack in charging stand. Align
raised rib on battery pack with groove in
charging stand (See Fig. 5).
5. Press down on battery pack to be sure
contacts on battery pack engage properly
with contacts in charging stand.
6. The charging stand has two (LED) indicator
lights, one green and one red.
When a battery pack is put into the charging
stand, the red LED will light,
indicating that the battery pack is charging
properly
(see Fig. 5a)
.
When the battery pack is charged and
removed from the charging stand, the red
light will go Off. The green LED will come on
only when there is a problem with the
battery or charger.
7. After normal use, 3 hours or less of charging
time is required to fully recharge battery pack. If battery pack is completely discharged,
6 hours or longer of charging time is required to fully recharge battery pack.
NOTE: Batteries will not reach full charge the first time they are charged.
Allow several cycles (operation followed by recharging) for them to become
fully charged.
Fig. 5
Fig. 5a
Red
LED
Red
LED
Charging Stand
Transformer
Fig. 4
®
Green
LED
NOTE: Within the warranty period, if the charging stand LED lights do not
operate properly, or the charging stand does not charge the battery pack, return
the charging stand / transformer and battery pack to your nearest Sears Store or
other Craftsman outlet for free replacement.