


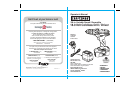

20
21
OPERATION cont. OPERATION cont.
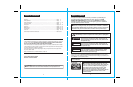
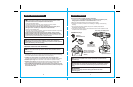
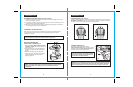
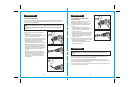
BUBBLE LEVEL (Fig. 11)
In order to insure a perfect right angle when
drilling / driving into a workpiece, you can use
the built-in bubble level on the top of the
drill / driver
(see Fig. 11). The bubble level
is designed to work when drilling / driving
in horizontal position. Center the air bubble
between the two lines on the Level viewer
as shown, and the drill / driver is in a
perpendicular angle to the workpiece.
This will insure that you drill/drive straight
into the workpiece.
Center Air Bubble between 2 lines
on Viewer for Horizontal drilling
Fig. 11
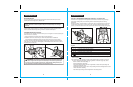
LED
Light
On-Tool
Bit Storage
Fig. 12
and 12a
LED LIGHT (Fig. 12)
Your drill /driver has an LED light that
illuminates the drill /drive area for hands-free
lighting in any application.
ON-TOOL BIT STORAGE (Fig. 12a)
Your drill / driver comes with
2 double ended screwdriver bits that store
on each side of the base.
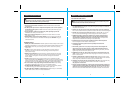
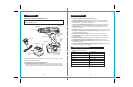
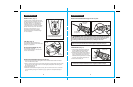
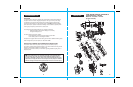
!
Make sure to insert the accessory bit straight into the chuck
jaws. Do not insert the accessory bit into the chuck jaws at an angle then tighten,
as shown in Figure 13a. This could cause the bit to be thrown from the drill,
resulting in possible serious personal injury or damage to the chuck.
WARNING:
INSTALLING ACCESSORY BITS (Figs.13 and 13a) cont.
NOTE: Rotate the chuck body in the direction of the hand pointing next to word GRIP to
tighten the chuck jaws. DO NOT use a wrench to tighten or loosen the chuck jaws.
®
®
®
Fig. 13
OPEN JAWS
(insert bit)
CLOSE JAWS
(to tighten bit)
Fig. 13a
WRONG
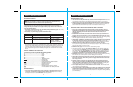
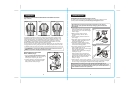
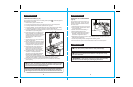
REMOVING BITS
(Fig. 14)
1. Lock the trigger switch Off by placing the
Forward / Reverse Selector Switch with
Power Lock-Off in the Center position.
2. Rotate the chuck sleeve counterclockwise
to open the chuck jaws. The chuck has an
icon of a pointing hand next to the word
RELEASE, showing the direction to release,
or loosen, the chuck jaws around the bit.
3. Remove the accessory bit.
NOTE: Rotate the chuck body in the direction of the hand pointing next to word RELEASE
to loosen the chuck jaws. DO NOT use a wrench to tighten or loosen chuck jaws.
®
®
Fig. 14
COUNTERCLOCKWISE
(Release Bit)
CLOCKWISE
(Grip Bit)
INSTALLING ACCESSORY BITS (Figs.13 and 13a)
1. Lock the trigger switch Off by placing the Forward / Reverse Selector Switch with Power
Lock-Off in the Center position.
2. Open or close the chuck jaws to a point where the opening is slightly larger than the bit size
you intend to use. Also, raise the front of the drill slightly to keep the bit from falling out of
the chuck jaws (see Fig. 13).
3. Insert the accessory bit.
4. Rotate the chuck clockwise to tighten (see Fig. 13). The chuck has an icon of a hand next
to the word GRIP, pointing to the direction to grip, or tighten, the chuck jaws securely on
the bit
®