Grounding _nstructions
iMPROPER GROUNDING CAN RESULT tN
ELECTRICAL SHOCK= IN THE EVENT OF A
SHORT CIRCUIT, GROUNDING REDUCES
THE RiSK OF SHOCK BY PROViDiNG AN
ESCAPE WiRE FOR THE ELECTRIC CUR-
RENT, THIS A_R COMPRESSOR MUST BE
PROPERLY GROUNDED.
1. The air compressor is equipped with a cord having a
grounding wire and an appropriate grounding plug=
The plug must be used with an outlet that has been
installed and grounded in accordance with alt local
codes and ordinances. The outlet must have the
same configuration as the plug. DO NOT USE AN
ADAPTER.
2. Do not modify the plug that has been provided. If it
does not fit the available outlet, the correct outlet
should be installed by a qualified electrician.
3. Inspect the plug and cord before each use. Do not use
the compressor if there are signs of damage.
If these grounding instructions are not completely
understood, or if you are not sure your compressor is
property grounded, have the installation checked by a
qualified electrician.
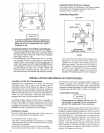
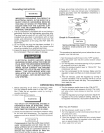
OUTLET PLUG
Terminal
G_'ounding ]/
Pin //
Breakqn Procedures
Serious damage may result if the following
break=in instructions are Rot closely
followed.
This procedure is required only once, before the air com-
pressor is put into service.
ELECTRICAL SHOCK HAZARD. WHEN
REPAmRING OR REPLACING THE CORD OR
PLUG, KEEP THE GROUNDING W_RE SEPA-
RATE FROM THE CURRENToCARRYmNG
W_RES. NEVER CONNECT THE GROUND-
gNG W_RE TO A FLAT BLADE PLUG TER=
MINAL, (THE GROUNDING W_RE HAS
INSULATION WITH AN OUTER SURFACE
THAT IS GREEN - WSTH OR W_THOUT YEL-
LOW STRIPES.)
1. Before attaching an air hose or accessory', make
sure the pressure switch lever is in the "OFF" posi-
tion. Close the air regulator outlet by turning it
counter-clockwise.
TOO MUCH AmR PRESSURE CAUSES A
HAZARDOUS R_SK OF BURSTING, CARE_
FULLY FOLLOW STEPS 3 THROUGH !2
EACH TmMETHE COMPRESSOR IS USED,
1. Set the pressure switch lever to the "OFF" position.
2, Plug the power cord into the correct branch circuit
receptacle.
3. l_drnthe regulator clockwise opening it fully, to prevent
air pressure build-up inthe tank.
4. Move the pressure switch lever to "ON/AUTO". The
compressor witl start.
5. Run the compressor for 30 minutes. Make sure the
regulator is open and there is no tank pressure build-
up.
6. After 30 minutes, close the regulator by turning it
counter-clockwise. The air receiver wilt filt to cut-out
pressure and the motor wilt stop. The compressor is
now ready for use.
OPERATING PROCEDURES
4, ]_Jrnthe pressure switch lever to the "ON-AUTO"
position and allow tank pressure to build. The motor
win stop when tank pressure reaches cut-out
pressure.
5. Open the regulator by turning it clockwise. Adjust the
regulator to the correct pressure setting. (See pg. 6
for regulator instructions.) Your outfit is ready for use.
3. Check the manufacturer's maximum pressure rating
for air tools and accessories. The reguator outlet
pressure must never exceed the maximum pressure
rating.
Compressed air from the outfit may certain
water condensation and oH mist. Do not
spray uRfi_tered air at aR item that coutd be
damaged. Some air operated toots or
devices may require filtered air, Read the
When You Are F_nished:
6. Set the pressure switch lever to "OFF".
7. qFdrnthe regulator counter-clockwise and set the out-
let pressure to zero.
8. Remove the air tool or accessory.
9. Open the regulator and allow the air to sowly bleed
from the tank. C_ose the regulator when tank pres_
sure is approximately 20 psi.
10. Drain water from air tank.
s


