


NOTE
Iftheoverloadprotectorshutsthemotorofffre-
quently,checkfora possiblevoltageproblem
Lowvoltagecanalsobesuspectedwhen:
1.themotordoesnotgetupto fulIpoweror
speed;
2. fusesblowoutwhenthemotorisstarted.
3. lightsdimwhenmotorisstarted,andremain
dimwhileit is running.
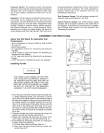
2. Removethefrontofthebeltguardbydisengagingthe
snaps.Insertaflatbladedscrewdriverateachsnap
Iocationand pry the bettguard apart.
3. The motor is mounted on a special base, By ioosenin9
the wing nut at the motor hold down ptate, the motor
can be tilted to allow for easy removal of the belt.
4. Remove belt and replace.
NOTE
The belt must be centered over the grooves on
the flywheel and motor pulley.
Be_t - Replacement
5. Tighten the wing nut until it makes contact with the
washer plus one additional turn.
6. Replace the front of the beltguard.
To Adjust Be_t Tension:
Tighten the wing nut until it makes contact with the
washer plus one additional turn.
SERIOUS _NJURY OR DAMAGE MAY
OCCUR _FPARTS OF THE BODY OR LOOSE
_TEMS GET CAUGHT IN MOVING PARTS.
NEVER OPERATE THE OUTFIT WITH THE
BELT GUARD REMOVED, THE BELT GUARD
SHOULD BE REMOVED ONLY WHEN THE
CO_4PBESSOB _SUNPLUGGED,
To Replace Belt:
f. Unplug compressor.
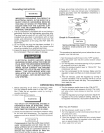
Pulley and Flywheem = Alignment
The compressor flywheM and motor puIley grooves
must be in-line (in the same plane) within 1/32" to assure
belt alignment within grooves. To check alignment, dis-
connect electrical power and remove the beltguard.
Place a straightedge against the outside of the flywheel
and measure the distance from it to the nearest groove.
Alignment is achieved when the other end of the straigh-
tedge is within 1/32" of the measured dimension at the
pulley grooves.
STORAGE
Before You Store The Air Compreseor:
1. Review the "Maintenance" section on the preceding
page and perform maintenance as necessary. Drain
the water from the air tank.
2. Set the OFF/AUTO switch to the "OFF" position, and
unplug the unit.
3. Remove the air tool or accessory.
4. Protect the electrical cord and air hose from damage
(such as being stepped on or run over}. Wind them
loosely around the outfit handte,
5. Store the compressor in a clean and dry location.
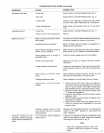
TROUBLESHOOTING GUIDE
PERFORMING REPAIRS MAY EXPOSE VOLTAGE SOURCES_ MOVING PARTS_ OR COMPRESSED
A_R SOURCES PERSONAL _NJURY MAY OCCUR. PRIOR TO ATTE_IPT_NG ANY REPAIRS THE
COMPRESSOR MUST BE UNPLUGGED, AND A_R TANK PRESSURE REUEVED° NEVER OPERATE
THE UNiT W_TN THE BELT GUARD REMOVED°
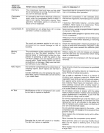
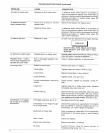
PROBLEM CAUSE CORRECTION
Excessive tank pressure -
safety valve pops off.
Pressure switch does not shut off
motor when compressor reaches
"cut-out" pressure.
Move the pressure switch lever to the "OFF" posi-
tion. If the outfit doesn't shut off, and the ebctricai
contacts are welded together, replace the pressure
switch.
If the contacts are good, check to see if the pin in
the bottom of the pressure retief vane is stuck, if it
does not move freely, reptace the valve.
Pressure switch "cut-out" too Return the outfit to the Sears Service Center to
high. check and adjust or replace switch.
Air leaks at fittings "Tubefittings are not tight enough. Tighten fittings where air can be heard escaping.
Check fittings with soapy water solution. DO NOT
OVER-TIGHTEN.