


Router Table for the Craftsman
-21-
OPERATION
V.
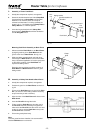
Edging and Profiling using the Back Fence
The router table has many advantages when profiling and
edging operations are to be carried out especially on
narrow workpieces. A Fine Height Adjuster fitted to the
router will make adjustment of the height far easier and
hence is highly recommended.
NOTE:
Make a test cut on a piece of waste material prior
to carrying out any routing operation.
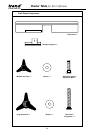
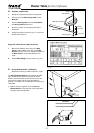
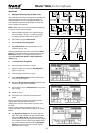
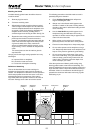
1. Mark the width and depth of cut required onto the
end of the timber. See fig. V.1 for typical profiling
and edging operation which can be carried out.
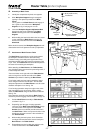
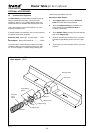
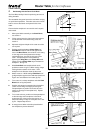
2. Place timber up against Back Fence.
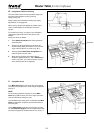
3. Release Back Fence Fixing Bolts.
4. Adjust Back Fence until required width of cut is
achieved. See fig. V.2a.
If bearing guided cutters are used, ensure that the Back
Fence is in line with the bearing or slightly behind it. The
Back Fence will give more support and provides the
retractable Safety Dust Guard and Spring Pressure
Clamp facility.
5. Lock Back Fence Fixing Bolts.
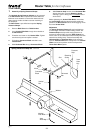
6. Release plunge mechanism on router.
7. Adjust the depth of cut using the Fine Adjuster (if
fitted), see fig. V.2b.
8. Lock-off plunge mechanism of router.
9. Lower Safety Dust Guard and check it will retract
freely over the workpiece.
10. Adjust the Spring Pressure Clamps (if fitted) to suit
the thickness and width of the timber.
11. Ensure that you have a Pushstick within easy reach
when routing.
12. Switch on router.
13. Pass timber over cutter with a consistant feed
speed.
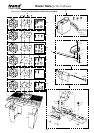
Ensure even pressure is kept on the workpiece down
onto the table and against the back fence.
Always ensure that your hand positions are never near
the cutter.
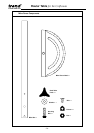
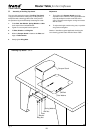
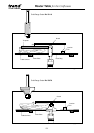
Use the correct procedure as shown in figs. V.3a - c.
Use the push stick to safely maintain pressure on narrow
timbers.
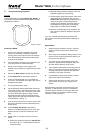
14. The Workpiece Support can be used to plane an
edge. The cutter should be set approximately 2mm
proud of the Back Fence. The material should be
routed until the planed edge passes onto the outfeed
fence. Switch off router, slide or pivot material away
from cutter. Replace material and bring Workpiece
Support out until it touches the material. Tighten
knob and continue routing.
fig. V.3a
fig. V.3b
fig. V.3c
Craft Range
Ref. C020
Craft Range
Ref. C072
Craft Range
Ref. C110
Craft Range
Ref. C040
Craft Range
Ref. C112
Craft Range
Ref. C094
fig. V.1
fig. V.2a
fig. V.2b