


viii
CAP-215
Instruction Manual Oil-Less Compressors
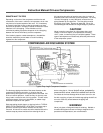
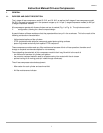
PULLEY ALIGNMENT & BELT TENSION
Setting Belt Tension
Improper pulley alignment and belt tension are causes for
motor overloading, excessive vibration and premature belt
and/or bearing failure. To prevent this from happening, check
the pulley alignment and belt tension on a regular basis.
At this time, inspect both the motor and compressor pulleys for
oil, grease, nicks or burrs. Clean or replace pulleys if
necessary. Make sure the pulleys are securely fastened. Align
the compressor pulley with the motor or engine pulley. Drive
belt grooves of both pulleys should be in line with each-other.
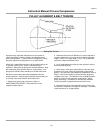
Belt tension should be measured and adjusted to provide
smooth operation. Step-by-step procedures are provided here
to correctly measure and set the drive belt tension:
1. Measure the span length of the drive. (Refer to
MAINTENANCE SCHEDULE.) See instructions in the
respective model manual.
2. Determine the amount of deflection (in inches) required to
measure deflection force (in pounds) by multiplying the span
length x 1/64 (i.e. 32" span length x 1/64 = 1/2" of deflection
required to measure deflection force).
3. Lay a straightedge across the top outer surface of a drive
belt from pulley to pulley.
4. At the center of the span, perpendicular to the belt, apply
pressure to the outer surface of the belt with a belt tension
gauge. Force the belt to the predetermined deflection (refer to
Step 2). Record the reading on the belt tension gauge and
compare to the chart. The deflection force reading should be
within the minimum and maximum values shown. Adjust
belt(s) accordingly. A new belt (or new belt set) should be
initially tensioned 1/3 greater than the maximum valve.
5. Recheck the tension of the new belts several times in the
first 50 hours of operation and adjust if necessary. Thereafter,
check belt tension on a regular basis.