


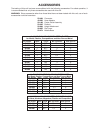


3
ADDITIONAL SAFETY RULES FOR BAND SAWS
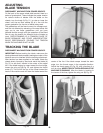
1. ADJUST the upper blade guide about
1
/8 above
the material being cut.
2. MAKE SURE that blade tension and blade tracking
are properly adjusted.
3. STOP the machine and wait for the blade to come to
a complete stop before removing scrap pieces from the
table.
4. ALWAYS keep hands and fingers away from blade.
5. CHECK for proper blade size and type.
6. DO NOT attempt to saw stock that does not have a
flat surface, unless a suitable support is used.
7. HOLD material firmly and feed into blade at a mod-
erate speed.
8. TURN OFF machine if the material is to be backed
out of an uncompleted cut.
9. MAKE “release” cuts before cutting long curves.
10. ADDITIONAL INFORMATION regarding the safe
and proper operation of this product is available from the
National Safety Council, 1121 Spring Lake Drive, Itasca,
IL 60143-3201 in the Accident Prevention Manual for
Industrial Operations and also in the Safety Data Sheets
provided by the NSC. Please also refer to the American
National Standards Institute ANSI 01.1 Safety Require-
ments for Woodworking Machinery and the U.S. Depart-
ment of Labor OSHA 1910.213 Regulations.
11. SAVE THESE INSTRUCTIONS. Refer to them fre-
quently and use them to instruct others.
FOREWORD
Delta Model 28-263 Band Saw is designed to give high quality performance with the capacity to cut stock up to 6
1
/4
thick x 13
3
/4 wide. It is ideal for contour or straight cutting and resawing operations to cut wood, plastic, building mate-
rials, bakelite and non-ferrous metals such as aluminum and copper. Delta Model 28-263 14 Band Saw includes: basic
machine with enclosed stand; motor; push button switch; rugged 14 x 14 table that tilts 45° right and 10° left for bevel-
ing operations; chip chute; blade and belt guards; arbor, motor pulleys and V-belt; Carter blade guides, and wood cut-
ting blade.
UNPACKING AND CLEANING
Carefully unpack the band saw and stand from the shipping containers. Remove the protective coating from the
machined surfaces of the band saw. This coating may be removed with a soft cloth moistened with kerosene (DO NOT
use acetone, gasoline or lacquer thinner for this purpose). After cleaning, cover all un-painted surfaces with a good qual-
ity paste wax.
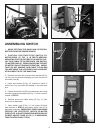
ASSEMBLING THE BAND SAW
The stand is shipped top down inside the shipping con-
tainer with the motor mounted to the inside top of the
stand. The on/off switch is wired to the end of the power
cord.
The motor must be removed from the inside top of the
stand and reassembled to the horizontal mounting bars
inside the stand as follows:
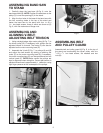
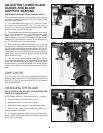
1. Remove the stand (A) Fig. 1, from the shipping con-
tainer being careful not to crimp the switch cord which
extends through the top of the stand. NOTE: Set the
stand on several blocks of wood to raise the stand off the
floor surface.
2. Remove panel (B) Fig. 1, from stand (A) by removing
two screws (C) and loosening two screws (D). Remove
panel on opposite side of stand in the same manner.
Fig. 1
D
A
C
B