


8
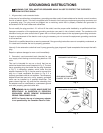
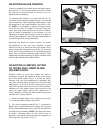
3. Push upper blade chuck locking lever (C) Fig. 11, to
the rear as shown. This will automatically release the
blade (D) from the upper chuck (E).
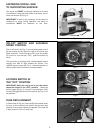
4. Remove the dust collection cup (A) by rotating knob
(B) 90° as shown in Fig. 12. Slide dust cup out of the
guides (C) by pulling it toward the front. NOTE: DO NOT
OPERATE THE UNIT WITH THE DUST CUP
REMOVED.
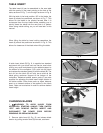
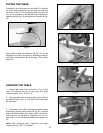
5. Push lower blade chuck locking lever (F) Fig. 13, to
the rear as shown. This will automatically release the
blade (G) from the lower chuck (H).
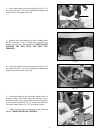
6. Insert new blade (I) into the upper blade holder (J)
making certain the blade teeth are pointing down
toward the table. Push upper blade chuck locking lever
(L) to the front as shown in Fig. 14. Insert new blade into
the lower blade holder Fig. 13 in the same manner.
7. Apply blade tension by referring to the following
section “ADJUSTING BLADE TENSION.”
Fig. 11
Fig. 12
Fig. 13
Fig. 14
C
D
E
B
C
A
G
F
H
I
J
L
K