


7
EXTENSION CORDS
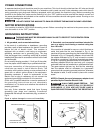
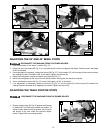
Use proper extension cords. Make sure
your extension cord is in good condition and is a 3-wire
extension cord which has a 3-prong grounding type plug
and matching receptacle which will accept the
machine’s plug. When using an extension cord, be sure
to use one heavy enough to carry the current of the
machine. An undersized cord will cause a drop in line
voltage, resulting in loss of power and overheating. Fig.
D shows the correct gauge to use depending on the
cord length. If in doubt, use the next heavier gauge. The
smaller the gauge number, the heavier the cord.
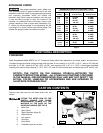
Fig. D
MINIMUM GAUGE EXTENSION CORD
RECOMMENDED SIZES FOR USE WITH STATIONARY ELECTRIC MACHINES
Ampere Total Length Gauge of
Rating Volts of Cord in Feet Extension Cord
0-6 120
up to
25 18 AWG
0-6 120 25-50 16 AWG
0-6 120 50-100 16 AWG
0-6 120 100-150 14 AWG
6-10 120
up to
25 18 AWG
6-10 120 25-50 16 AWG
6-10 120 50-100 14 AWG
6-10 120 100-150 12 AWG
10-12 120
up to
25 16 AWG
10-12 120 25-50 16 AWG
10-12 120 50-100 14 AWG
10-12 120 100-150 12 AWG
12-16 120
up to
25 14 AWG
12-16 120 25-50 12 AWG
12-16 120
GREATER THAN 50 FEET NOT RECOMMENDED
FOREWORD
Delta ShopMaster Model MS275 is a 10" Compound Power Miter Saw designed to cut wood, plastic, and aluminum.
Compound angle and bevel cutting are easy and accurate. It can crosscut up to 5-5/8" x 2-3/4", miter at 45° both left
and right 4" x 2-3/4", bevel at 45° left 1-5/8" x 5-5/8", and compound 45° x 45°, 4" x 1-5/8". It has trigger-controlled
indexing with positive miter stops at 0°, 15.5°, 22.5°, 30°, and 45° both left and right, and bevel stops at 0° and 45° left.
FUNCTIONAL DESCRIPTION
NOTICE: THE PHOTO ON THE MANUAL COVER ILLUSTRATES THE
CURRENT PRODUCTION MODEL. ALL OTHER ILLUSTRATIONS CONTAINED
IN THE MANUAL ARE REPRESENTATIVE ONLY AND MAY NOT DEPICT THE
ACTUAL COLOR, LABELING OR ACCESSORIES AND ARE INTENDED TO
ILLUSTRATE TECHNIQUE ONLY.
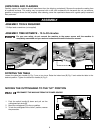
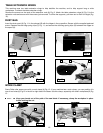
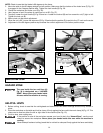
CARTON CONTENTS
Remove the miter saw and all loose items from the
carton.
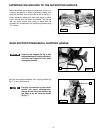
LIFTING THE MITER SAW BY THE
SWITCH HANDLE CAN CAUSE
MISALIGNMENT. ALWAYS LIFT THE
MACHINE BY THE BASE OR THE
CARRYING HANDLE (SEE FIG. 8)
1. Miter Saw
2. Work Clamp
3. Table Extension Wings (2)
4. Blade Wrench
5. Hex wrench
6. Dust Bag
7. Dust Spout
8. Panhead screw (not shown)
Fig. 1
1
4
3
2
5
6
7