


10
NOTE
If the overload protector shuts the motor off
frequently, check for a possible voltage prob-
lem. Low voltage can also be suspected when:
1. The motor does not get up to full power or
speed.
2. Fuses blow out when the motor is started.
3. Lights dim when motor is started, and re
main dim while it is running.
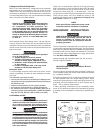
Pulley and Flywheel - Alignment
The compressor flywheel and motor pulley grooves must be
in-line within 1/32" to assure belt alignment within sheave
grooves. To check alignment, unplug compressor and re-
move the beltguard. Place a straight edge against the out-
side of the flywheel and measure the distance from it to the
nearest groove. Alignment is achieved when the other end of
the straight edge is within 1/32" of the measured dimension
at the pulley grooves.
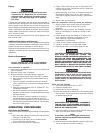
Servicing Intake and Exhaust Valves
The intake and exhaust valves as well as the valve plates and
cylinder head will, over a period of time, accumulate a residue
of carbon-like material on their surfaces. The material will
decrease the efficiency of the compressor. These compo-
nents should be inspected whenever a problem is suspected
and cleaned or replaced with new parts. Refer to "Outfit
PartsListing", if required. Use the following procedure to
inspect the parts.
1. Unplug compressor and relieve all air pressure from
the air tank.
2. Disconnect the pressure release and outlet lines from
the air compressor.
3. Remove the hardware securing the cylinder head and
remove the cylinder head and valve plate.
MANY SOLVENTS ARE HIGHLY FLAMMABLE
AND A HEALTH HAZARD IF INHALED. ALWAYS
OBSERVE THE SOLVENT MANUFACTURER'S
SAFETY INSTRUCTIONS AND WARNINGS.
4. Clean carbon deposits in head cavities and valve plates
with lacquer thinner or other suitable solvent.
5. Clean the intake and exhaust valves with lacquer thinner
or other suitable solvent. Inspect valves; replace if
necessary.
NOTE
Do not use gasket cement on any gasket
surface as this may clog compressor valve
cavities and air flow areas.
6. Reinstall valve plate and gaskets.
7. Install the cylinder head. Snug mounting screws and
studs tight, then torque to 25 to 30 foot pounds starting
at the center and working toward the outside.
8. Reconnect the pressure release and outlet lines to the
compressor pump.
Belt - Replacement
SERIOUS INJURY OR DAMAGE MAY OCCUR IF
PARTS OF THE BODY OR LOOSE ITEMS GET
CAUGHT IN MOVING PARTS. NEVER OPERATE
THE OUTFIT WITH THE BELT GUARD REMOVED.
THE BELT GUARD SHOULD BE REMOVED ONLY
WHEN THE COMPRESSOR IS UNPLUGGED.
Belt Guard - Removal and Installation
(Refer to Outfit Parts Listing, if required.)
1. Move the "ON/AUTO-OFF" lever to the "OFF" position.
Unplug the compressor. Release all air tank pressure.
2. On one-piece belt guards, remove the two beltguard
screws on the bottom front of the outfit.
3. On two-peice belt guards, remove the front of the belt
guard by disengaging the snaps. Insert a flat bladed
screwdriver at each snap location and pry the beltguard
apart.
Replace Belt
1. Unplug compressor.
2. Remove (one-piece) beltguard, or front of (two-piece)
beltguard as described above.
NOTE
Loosen the wing nut at the hold down plate. The
motor can be tilted to allow for easy removal or
installation of the belt.
3. Remove belt and replace.
NOTE
The belt must be centered over the grooves
on the flywheel and motor pulley.
Adjust Belt Tension
Adjust belt tension by tightening the wing nut until it makes
contact with the washer, plus one additional turn.
Pressure Switch - Replacement
PRESSURE LOADS BEYOND DESIGN LIMITS
MAY CAUSE TANK RUPTURE OR EXPLOSION.
PRESSURE SWITCH OPERATION IS RELATED
TO MOTOR HP, TANK RATING AND SAFETY
VALVE SETTING. DO NOT ATTEMPT TO ADJUST,
REMOVE OR DEFEAT THE PRESSURE SWITCH,
OR CHANGE AND MODIFY ANY PRESSURE CON-
TROL RELATED DEVICE. IF REPLACEMENT IS
NECESSARY, THE SAME RATED SWITCH MUST
BE USED. CONTACT A DEVILBISS AIR POWER
AUTHORIZED SERVICE CENTER FOR REPLACE-
MENT.
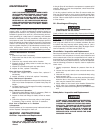
Motor Overload Protector - Reset
The motor has a manual thermal overload protector. If the
motor overheats for any reason, the overload protector will
shut off the motor. The motor must be allowed to cool down
before restarting. Turn the unit off. To restart, depress the red
reset button located on the end of the motor and turn ON/
AUTO-OFF switch to the ON position.