


8
4. Clean or blow off fins or any part of compressor that
collects dust and dirt. Compressor will run cooler and
provide longer service.
5. Before attaching an air hose or accessory make sure
the pressure switch lever is in the "OFF" position.
Close the air regulator outlet by turning it counterclock-
wise.
6. Attach hose and accessory
Start the compressor outfit and check the following:
1. With the outlet valve closed, start the compressor
outfit. Allow the outfit to pump up to cut-off
pressure.
2. Make sure that all controls are operating correctly.
Refer to "Description of Operation" section of this
manual.
3. Check all line fittings and piping for air leaks. Even
minor leaks can cause the compressor to over
work, resulting in premature breakdown or
unsatisfactory performance.
4. Check for any unusual vibration and noise.
5. Check for oil leaks. Correct any leaks found.
6. Open shutoff valve. Your outfit is ready for use.
TOO MUCH AIR PRESSURE CAUSES A HAZARD-
OUS RISK OF BURSTING. CHECK THE
MANUFACTURER'S MAXIMUM PRESSURE RAT-
ING FOR AIR TOOLS AND ACCESSORIES. THE
REGULATOR OUTLET PRESSURE MUST NEVER
EXCEED THE MAXIMUM PRESSURE RATING. ON
MODELS HAVING ONLY A SHUT-OFF VALVE, YOU
MUST INSTALL A REGULATOR BEFORE USING
ACCESSORIES RATED AT LESS THAN 125 PSIG.
Compressed air from the outfit may contain water
condensation and oil mist. Do not spray unfil-
tered air at an item that could be damaged by
moisture. Some air operated tools or devices may
require filtered air. Read instructions for the air
tool or device.
When You Are Finished:
7. Set the pressure switch lever to "OFF".
8. Close the shutoff valve.
9. Remove the air tool or accessory.
10.Open the shutoff valve and allow the air to slowly bleed
from the tank. Close shutoff valve when tank pressure
is approximately 20 PSI.
DRAIN TANK DAILY. WATER WILL CONDENSE IN
THE AIR TANK. IF NOT DRAINED, WATER WILL
CORRODE AND WEAKEN AIR TANK, CAUSING A
RISK OF AIR TANK RUPTURE.
11.With tank pressure at approximately 20 PSI, open the
drain cock and allow moisture to drain.
NOTE
If the drain cock valve is plugged, release all air
pressure. The valve can then be removed, cleaned
and reinstalled.
12.After the water has been drained, close the drain cock.
The air compressor can now be stored.
Piping
Plastic or PVC pipe is not designed for use with
compressed air. Regardless of its indicated
pressure rating, plastic pipe can burst from air
pressure. Use only metal pipe for air distribu-
tion lines.
If a pipe line is necessary, use pipe that is the same size as
the air tank outlet. Piping that is too small will restrict the flow
of air. If piping is over 100 feet long, use the next larger size.
Bury underground lines below the frost line and avoid pockets
where condensation can gather and freeze. Apply pressure
before underground lines are covered to make sure all pipe
joints are free of leaks.
Connect the piping to the 3/8" NPT air outlet opening at the
end of the air tank.
Additional Regulators and Controls
Since the air tank pressure is usually greater than that which
is needed, a separate regulator is employed to control the air
pressure ahead of any individual air driven device.
Separate air transformers which combine the function of air
regulation, moisture and dirt removal should be used where
applicable.
Break-in Procedures
Serious damage may result if the following
break-in instructions are not closely followed.
This procedure is required:
1. Before the air compressor is put into service. (Before the
hose is installed)
2. When the check valve is replaced.
3. When a complete compressor pump is replaced.
a. Set the pressure switch lever to the "OFF" position.
b. Plug the power cord into the correct branch circuit
receptacle.
c. Turn the regulator clockwise (or open the shut-off
valve), opening it fully, to prevent air pressure build-up
in the tank.
d. Move the pressure switch lever to "ON/AUTO". The
compressor will start.
e. Run the compressor for 30 minutes. Make sure the
regulator, or shut-off valve, is open and there is no tank
pressure build-up.
f. After 30 minutes, close the regulator by turning it
counterclockwise or close the shut-off valve by
turning the knob clockwise. The air receiver will fill to
cut-out pressure and the motor will stop. The compres-
sor is now ready for use.
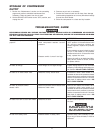
OPERATING PROCEDURES
Daily Start-Up Checklist
Perform the following checks before starting the compressor
outfit.
1. Make sure that nothing is blocking the belt guard air
openings or air filter inlet.
2. Pull the ring on all safety valve to make sure the
valve moves freely and smoothly.
3. Check the oil level; add oil if necessary.