


9
MAINTENANCE
UNIT CYCLES AUTOMATICALLY WHEN POWER
IS ON. DURING MAINTENANCE, YOU COULD BE
EXPOSED TO VOLTAGE SOURCES, COM-
PRESSED AIR OR MOVING PARTS. PERSONAL
INJURIES CAN OCCUR. UNPLUG THE UNIT AND
BLEED OFF ALL AIR TANK PRESSURE BEFORE
DOING ANY MAINTENANCE OR REPAIR. NEVER
OPERATE THE UNIT WITH THE BELT GUARD
REMOVED.
To ensure efficient operation and longer life of the air com-
pressor outfit, a routine maintenance schedule should be
prepared and followed. The following routine maintenance
schedule is geared to an outfit in a normal working environ-
ment operating on a daily basis. If necessary, the schedule
should be modified to suit the conditions under which your
compressor is used. The modifications will depend upon the
hours of operation and the working environment. Compressor
outfits in an extremely dirty and/or hostile environment will
require a greater frequency of all maintenance checks. Lubri-
cate compressor motor (if required) according to
manufacturer's instructions, which are attached to your motor.
Routine Maintenance Schedule
Daily:
1. Check oil level. Add if necessary.
2. Drain water from the air tank, any moisture separators or
transformers.
3. Check for any unusual noise and/or vibration.
4. Manually check all safety valves to make sure they are
operating properly.
5. Inspect for oil leaks and repair any leaks found.
6. Inspect air filter, replace if necessary.
Every 40 Hours of Operation:
1. Clean and inspect the air intake filter; replace if
necesssary.
2. Inspect condition of drive belt; replace if necessary.
Every 100 Hours of Operation:
1. Drain and refill compressor crankcase with 16 fluid ounces
(473.2 ml) of clean compressor or Castrol Heavy Duty 30
weight .
2. Increase frequency of oil changes if humidity or operating
conditions are extreme.
Every 160 Hours of Operation:
1. Check drive belt tension; adjust if necessary. (Refer to
SERVICE INSTRUCTIONS in this manual.)
2. Inspect air lines and fittings for leaks; correct as neces-
sary.
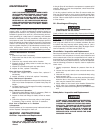
3. Check the alignment of the motor pulley to the flywheel.
If necessary, align to within 1/32 inch on centerline.
Each Year of Operation or if a Problem
is Suspected:
Check condition of air compressor pump intake and exhaust
valves. Replace if damaged or worn out.
SERVICE INSTRUCTIONS
Air Filter - Inspection and Replacement
Keep the air filter clean at all times. Do not
operate the compressor with the air filter re-
moved.
A dirty air filter will not allow the compressor to operate at full
capacity. Before you use the compressor, check the air filter
to be sure it is clean.
If it is dirty, replace it with a new filter. On some models, the
filter may be removed by using a pair of needle nosed pliers
or a screwdriver. Pull or pry out the old filter. Push in the new
air filter. Other models require removal of the belt guard and/
or filter retainer.
Oil - Checking and Changing
Overfilling with oil will cause premature com-
pressor failure. Do not overfill.
Check oil level in the crankcase daily. Remove the oil fill plug.
The oil level should be even with the top of the fill hole and must
not be allowed to be lower than 3/8" from the top (6 threads)
at any time. It is recommended that the oil be changed after
every 100 hours of operation. To drain the oil, remove the oil
drain plug and collect the oil in a suitable container. Be sure
to replace the plug securely before adding new oil. Use a
compressor oil such as Castrol Heavy Duty 30 weight. Crank-
case oil capacity is 16 fluid ounces (473.2 ml).
Check Valve - Inspection and Replacement
Remove and inspect the check valve at least once a year or
more often if the compressor is heavily used. Moisture and
other contaminants in the hot compressed air will cause an
accumulation of a carbon-like residue on the working parts.
If the valve has heavy carbon build-up, it should be replaced.
Use the following procedure to inspect, clean or replace the
check valve.
1. Unplug compressor. Release air pressure from the air
tank.
2. Loosen the top and bottom tube nuts and remove the
outlet tube.
3. Unscrew the check valve (turn counterclockwise) using
socket wrench (7/8").
4. Check that the valve disc moves freely and that the spring
holds the disc in the upper, closed position. The check
valve may be cleaned with a solvent.
5. Apply sealant to the check valve threads. Reinstall the
check valve (turn clockwise). Do not overtighten.
6. Replace the outlet tube and tighten top and bottom tube
nuts.
Safety Valve - Inspection and Replacement
IF THE SAFETY VALVE DOES NOT WORK PROP-
ERLY, OVER-PRESSURIZATION MAY OCCUR
CAUSING AIR TANK RUPTURE OR EXPLOSION.
DAILY PULL THE RING ON THE SAFETY VALVE
TO MAKE SURE THAT THE SAFETY VALVE OP-
ERATES FREELY. IF THE VALVE IS STUCK OR
DOES NOT OPERATE SMOOTHLY, IT MUST BE
REPLACED WITH A VALVE HAVING THE SAME
PRESSURE RATING.