


11
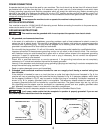
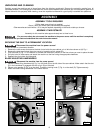
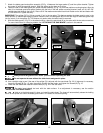
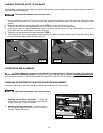
1. Insert the female end of the switch cord through the hole (F) Fig. 13 in the corner of the saw. Open the motor cover and
route the switch cord (F) Fig. 14 behind the cord guard (G). Plug the switch cord into the motor cord (H) Fig. 14.
2. Remove all slack and rest the cord on the dust chute (Fig. 14).
Do not allow the cord to come in contact with the blade, belt, or pulleys.
Fig. 13
Fig. 14
F
F
G
H
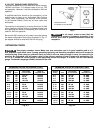
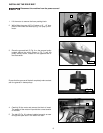
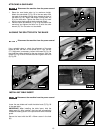
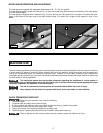
ATTACHING THE BLADE GUARD AND SPLITTER ASSEMBLY
Disconnect the machine from the power source!
Check to see if the blade is attached. If it is, remove the saw blade from the saw using the supplied
wrenches.
ROUTING THE CORD
X
Y
Z
1. Fasten the rear splitter mounting bracket (A) Fig. 15 to the rear trunnion. Align the two holes (B) in the rear splitter
mounting bracket with the two holes in the trunnion. Place a 1/4" lock washer and a 1/4" flat washer on a 1/4-20 x
3/4" hex head bolt. Position the bolt through the hole in the rear splitter mounting bracket. Thread the bolt into the rear
trunnion. Repeat this process for the remaining hole. Loosely tighten the hardware for further adjustment.
2. Raise saw arbor to its highest position.
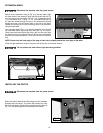
3. Remove the screw, lock washer and large washer (C) Fig. 16 (and pictured in inset) from the inside splitter mounting
bracket.
Fig. 15
Fig. 16
A
B
C
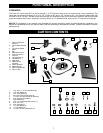
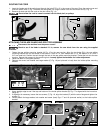
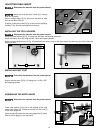
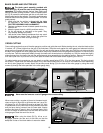
4. Use a straight edge to see if the top and bottom of the inside splitter bracket (D) Fig. 17 is aligned with the inner arbor
flange (E).
5. If alignment is necessary, loosen the two screws, (F) Fig. 18, align the bracket (D) with the arbor flange and tighten the
screws (F).
6. Loosely attach the large washer, lock washer and screw (inset) Figs. 17 and 18 (removed earlier) to the inside splitter
bracket.
D
E
D
C
Fig. 17
Fig. 18
F