


8
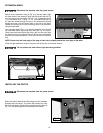
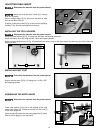
UNPACKING AND CLEANING
Carefully unpack the machine and all loose items from the shipping container(s). Remove the protective coating from all
unpainted surfaces. This coating may be removed with a soft cloth moistened with kerosene (do not use acetone, gasoline or
lacquer thinner for this purpose). After cleaning, cover the unpainted surfaces with a good quality household floor paste wax.
ASSEMBLY
ASSEMBLY TOOLS REQUIRED
Phillips-head screw driver (not supplied)
12mm, 13mm, and 18mm open-end wrenches (not supplied)
Other wrenches and a drill with a 1/4" bit may be required, depending on the fence or table you choose.
ASSEMBLY TIME ESTIMATE
Assembly for this machine takes approximately two to three hours.
For your own safety, do not connect the machine to the power source until the machine is completely
assembled and you read and understand the entire instruction manual.
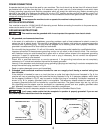
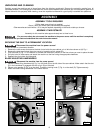
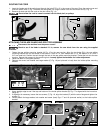
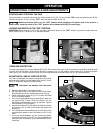
To bolt the saw to a permanent location:
1. Remove the nine screws that secure the dust chute inside the saw cabinet, six of which are shown at (A) Fig. 1.
2. Remove the side panel below the motor cover by loosening all six screws (B).
3. Find the holes (C) Fig. 1 in the bottom of the saw and mark their position on the floor where you want to place the saw.
4. Drill pilot holes in these spots and attach the machine to the floor using the appropriate hardware.
5. Reattach the dust chute and side panel.
SECURING THE SAW TO A PERMANENT LOCATION
Disconnect the machine from the power source!
B
A
Fig. 1
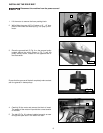
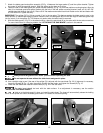
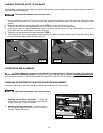
1. Place the blade-tilting handwheel (A) Fig. 3 on the shaft (B) on the left side of the saw cabinet. Make certain that the slot
(C) in the handwheel is engaged with the roll pin (D) on the shaft.
2. Place a nylon washer (E) Fig. 4 on the shaft. Thread the locking knob (F) Fig. 4 on the shaft (G). Tighten securely.
3. Attach the blade raising handwheel in the same manner.
BLADE ADJUSTING HANDWHEELS
Disconnect the machine from the power source!
C
Fig. 2
A
B
C
D
E
F
G
Fig. 3
Fig. 4