


2
Operating Instructions
Important
Please read these operating and safety instructions carefully and completely.
For your own safety, before using this equipment check that the voltage is
correct and that all handles and parts are rmly secured. If you are uncertain
about any aspect of using this equipment contact your distributor.
Please Keep These Instructions
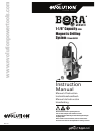
Model BORA 2800 Specications
Motor (230v or 115v 50/60 Hz) (Watts): 1200
Maximum Cutter Diameter: 1-1/8” (USA) 28mm (UK/EU)
Maximum Cutting Depth: 2” 50mm
RPM No Load (min-1): 570
Recommended Maximum Duty Cycle (Minutes): 30
Sound Pressure Level (Under Load) (dB(A)): 90
Weight: 31lb 14kg
Max Dimensions (Rack Fully Raised): 23-1/4”x8-1/2”x12-1/8” 585x220x310
Min Dimensions (Rack Fully Lowered): 17-3/4”x5-1/8”x12-1/8” 450x130x310
Magnet Dimensions: 2”x3-1/8”x6-1/2” 50x80x164
Magnetic Adhesion: 2860lb 1300kg
Cutter Retainer Internal Diameter: 3/4” 19mm Weldon Shank
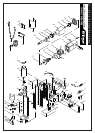
Standard Equipment Supplied With Unit: 1 Coolant Tank, 1 Coolant Pipe, 1
Guard, 3 Hex keys, 3 Handles, 2 Buttery Screws, 2 Spring Washers, 1 Chain, 1
Chuck, 1 Chuck Key, Carry Case.
Ear and eye protection MUST be worn while operating this equipment.
Do NOT touch the cutter while it is in motion. Always follow the Personal
Protection Equipment (PPE) recommendations while operating this tool.
This machine is designed specically for drilling holes in mild steel using the
appropriate cutters and accessories. It should NOT be modied and / or used
for any application other than for which it was intended, including powering other
equipment.
Ensure that the total work area can be viewed from the operating position. Use
barriers to keep people away. Do not operate the tool in explosive environments
– power tools create sparks that may ignite ammable materials or gases. Do
not operate the tool in damp or wet conditions or areas, as electric shocks may
result. Always use both hands to operate the tool. Always ensure that the material
you are working on is securely clamped.
• This tool is equipped with an approved cord and plug for its intended
Country of use. The green and yellow conductor in the cord is the grounding
wire, never connect this to a live terminal.
• Remove plug from power supply before replacement of the cutter, making
adjustments or other maintenance work.
• We recommend the use of genuine Evolution supplied cutters.
•
Inspect the machine and cutter before each use and do not use
deformed, cracked, worn or otherwise damaged cutters.
• Ensure the cutter is correctly mounted and do not stop by hand.
• Do not use cutters that do not comply with the characteristics specied in
these instructions.
•
Ensure that the gibs (dovetail slides) are correctly adjusted before
each use. This is essential for proper and safe operation of the
machine.
• Always keep the power cord away from moving parts of the tool.
• When you put the tool away, switch off the motor and ensure that all moving
parts have come to a complete standstill.
•
Never use the tool without the original protection guard system.
Machine Set Up: Changing Cutters
To insert a cutter, rst insert the pilot pin. Then slide the cutter into the adaptor,
align the proper at with the locking screw(s) and tighten securely with the
supplied hex wrench. CAUTION: Ensure that the locking screw is on a at of
the cutter and not just against the rounded shank. To remove cutter, reverse the
procedure. Ensure that the coolant feed tap is on and coolant feeds properly by
pushing the pilot pin. If it feeds too quickly or slowly, adjust the tap accordingly.
Keep the tap closed when not in use.