


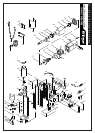


Changing The Arbor / Drill Chuck
This machine can easily be converted to operate standard twist drills. Using
a 20mm spanner (not supplied) rst remove the arbor then remove the arbor
support bracket by undoing the 4 M5 bolts. Fit chuck. Insert twist drill and tighten
with chuck key. To remove drill chuck, simply reverse the procedure.
Magnetic Drill Safety
The drill’s magnetic adhesion depends on the thickness of the work piece. 1/2”
(12mm) is the optimum thickness for safe operation. Keep the magnet clean of
metal chips and other dirt and debris. These will seriously reduce the magnetic
adhesion. Ensure that the magnet has adhered to the work piece rmly before
switching on the drill. The drill must be operated on its own electrical outlet with
a Residual Current Device as other units sharing an outlet could result in loss
of magnetic adhesion. Always use the supplied safety chain. Before each
use always check the coolant feed and level is sufcient. Never operate without
cutting coolant or paste. When drilling I beams with a curved surface, mount
the machine parallel to the work piece. Avoid operating the drill at greater than
a 45 degree angle. Over - head drilling is extremely hazardous and is not
recommended.
Adjusting Gibs (Dovetail Slides) Free Play
Periodically check, lubricate, and adjust as necessary. To adjust, use the supplied
wrench to loosen the lock nuts. Using the supplied Hex key, adjust the screws
evenly whilst moving the handle up and down, so that there is no free play, yet no
binding anywhere through its range of travel. Re-tighten the lock nuts.
Operating Advice
Position the machine using the pilot pin as an aid to locating the center of the cut.
Switch on the magnet and check that the cutter is still in the correct position and
the machine is securely held to the work piece. With the motor head in the raised
position, switch on the motor and allow to come up to full speed. Turn the crank
handle to begin cutting. Use light pressure at rst to keep bit from wandering,
and then continue with normal pressure. Do not force the tool – let the speed of
the cutter do the work. Cutting performance will not improve by applying more
pressure on the tool and cutter and motor life will be reduced. Regulate the ow
of cutting coolant as required with the coolant feed tap. Use less pressure as the
cutter exits through the material. Always provide a method of catching the slug,
where the ejected slug may cause injury. CAUTION: the slug ejects at end of cut
and is very hot.
Maintenance And Troubleshooting
Keep tool and cord clean. In case of electrical or mechanical malfunction,
immediately switch off the tool and disconnect the plug. Excessive sparking may
indicate the presence of dirt in the motor or worn out carbon brushes. Periodically
check brushes for wear and replace when they reach 1/4” (6mm), also check that
the machine is well lubricated. For all other service and maintenance, take the
machine to an authorized service center, or to Evolution USA, Iowa, if bought in
the USA, after typically 40 drilling hours, dependent upon the type of workload
it has endured.
Accessories – Genuine Evolution Supplied
HTA153 Chuck & Key 1/2” (13mm)
HTA030 Countersink Bit 1-1/4” (0-30mm)
HTxxS Short 1” (25mm) Cutters Available 7/16” – 1-1/8” (12mm - 28mm)
HTxxL Long 2” (50mm) Cutters Available 7/16” – 1-1/8” (12mm - 28mm)
Notice: Normal wear and tear and damage caused by misuse is not
covered under the 12-Month guarantee.
Bedienungsanleitung
Wichtig
Bitte lesen Sie die Bedienungsanleitung und die Sicherheitshinweise
sorgfältig und vollständig durch. Zu Ihrer eigenen Sicherheit überprüfen
Sie bitte vor jeder Benutzung, dass die Spannung der Stromquelle mit
den Angaben auf dem Typenschild des Gerätes übereinstimmt, und dass
alle Handgriffe und Geräteelemente sicher montiert sind. Sollten Sie zu
irgendeinem Aspekt der Bedienung dieses Gerätes Fragen haben, wenden
Sie sich bitte an Ihren Händler.
να ελέγχετε την παροχή του ψυκτικού και εάν το επίπεδο είναι αρκετό.
Ποτέ μην κάνετε χρήση χωρίς ψυκτικό. ή πάστα τρυπανιού. Όταν
τρυπάτε δοκούς με κυρτή επιφάνεια ρυθμίστε το μηχάνημα παράλληλα
προς το υλικό εργασίας. Αποφεύγετε να χειρίζεστε το τρυπάνι υπό
γωνία μεγαλύτερη των 45°. Η χρήση του τρυπανιού προς τα πάνω είναι
εξαιρετικά επικίνδυνη και δεν συνιστάται.
Ρύθμιση βραχιόνων (Γλίστρες Χελιδονουράς) Χαλάρωμα
Περιοδικά ελέγχετε, λιπαίνετε και ρυθμίζετε όπως χρειάζεται. Για να
ρυθμίσετε, χρησιμοποιήστε γαλλικό κλειδί για να ξεσφίξετε τα παξιμάδια
κλειδώματος Κάνοντας χρήση του εξάγωνου κλειδιού ρυθμίστε τις βίδες
ομοιόμορφα ενώ κινείτε τη χειρολαβή πάνω-κάτω έτσι ώστε να μην
υπάρχει χαλάρωση αλλά ούτε και κράτημα πουθενά σε όλο το πεδίο
διαδρομής. Σφίξτε ξανά τα παξιμάδια κλειδώματος.
Συμβουλές Χειρισμού
Τοποθετήστε το μηχάνημα κάνοντας χρήση της βελόνης-πιλότου
ως βοήθημα για τον εντοπισμό του κέντρου διάτρησης. Ανάψτε τον
μαγνήτη και ελέγξατε ότι το τρυπάνι είναι ακόμη στη σωστή θέση και
ότι το μηχάνημα είναι στερεωμένο ασφαλώς επί του υλικού εργασίας.
Μη την κεφαλή του κινητήρα στην ανυψωμένη θέση ανάψτε τον
κινητήρα και αφήστε τον να αποκτήσει την πλήρη ταχύτητα. Γυρίστε
τον χειροστρόφαλο για να αρχίσετε τη διάτρηση. Ασκείστε ελαφρά
πίεση στην αρχή ια να αποφύγετε την παρεκτροπή του τρυπανιού και
στη συνέχεια συνεχίστε με φυσιολογική πίεση. Μην πιέζετε το εργαλείο
–αφήστε την ταχύτητα του τρυπανιού να κάνει τη δουλειά. Η απόδοση
της διάτρησης δεν θα βελτιωθεί με την άσκηση περισσότερες πίεσης επί
του εργαλείου και η διάρκεια ζωής του κινητήρα και του τρυπανιού θα
μειωθεί. Ρυθμίστε τη ροή του ψυκτικού διάτρησης όπως απαιτείται από
την βαλβίδα παροχής του ψυκτικού. Ασκείστε λιγότερη πίεση καθώς το
τρυπάνι εξέρχεται μέσω του υλικού. Πάντοτε να έχετε μια μέθοδο για να
συγκεντρώνετε τα υπολείμματα υγρού γιατί, η εκτόξευσή του μπορεί να
προκαλέσει τραυματισμό. ΠΡΟΣΟΧΗ :Το τήγμα εκτοξεύεται στο τέλος
της διάτρησης και είναι πολύ καυτό.
Συντήρηση και Μηχανικές Βλάβες
Διατηρήστε το εργαλείο και το καλώδιό του καθαρά. Σε περίπτωση
μηχανικής ή ηλεκτρικής δυσλειτουργίας. αμέσως σβήστε το εργαλείο και
αποσυνδέστε το από την πρίζα. Πολλοί σπινθήρες πιθανόν να υποδηλώνει
την παρουσία ρύπων στον κινητήρα ή την φθορά στα καρβουνάκια.
Περιοδικά ελέγχετε τα καρβουνάκια για φθορά και αντικαταστήστε τα
όταν φθάσουν μέγεθος 8 χιλιοστά, επίσης ελέγξετε εάν το μηχάνημα
έχει λιπανθεί καλά. Για όποιο άλλο σέρβις και συντήρηση πηγαίνετε
το μηχάνημα σε έναν εξουσιοδοτημένο κέντρο συντήρησης ή στο
Evolution USA, Iowa, εάν έχει αγοραστεί στις ΗΠΑ, τυπικά μετά από
40 ώρες διάτρησης ανάλογα και με τον τύπο του φόρτου εργασίας που
έχει αντιμετωπίσει
Εξαρτήματα Εξοπλισμού – Γνήσια Evolution Παρεχόμενα
HTA153
Τσοκ & Κλειδί Τσοκ 13χιλιοστά
HTA030
Ανταλλακτικό φρέζας 0-30χιλιοστά
HTxxS
Κοντα (25χιλιοστά) Τρυπάνια διαθέσιμα 12–28χιλιοστα
HTxxL
Long (50χιλιοστά) Τρυπάνια διαθέσιμα 12–28χιλιοστά
Ειδοποίηση : Φυσιολογική φθορά και βλάβη που προκαλείται από
κακό χειρισμό δεν καλύπτεται από την εγγύηση των 12 μηνών
4 19