


Measuring the Error
Before adjusting the saw, you first need to measure
whether it is accurately calibrated to begin with. If you
attempt to exceed the factory calibration threshold, you
may end up actually making the saw less accurate.
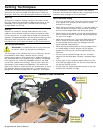
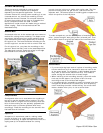
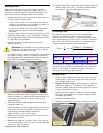
1. Number the sides of the scrap piece of wood from 1 to
4, starting with the best edge.
► If you cut the wood on the left side of the blade (as
shown in this example), then number the sides in a
clockwise direction (as shown below).
► If you cut the wood on the right side of the blade,
then number the sides in a counterclockwise
direction.
Supplemental User’s Manual 25
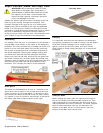
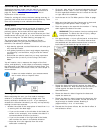
2. On the #1 side, which will eventually become the final
calibration offcut, label it “Left” and “Right” as shown.
Do this regardless whether the cut is made on the left
or right side of the sawblade.
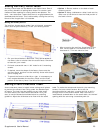
3. Place the scrap on the saw with the number “1”
against the fence.
WARNING! This procedure involves cutting small
workpieces. To reduce the risk of injury, always
clamp the workpiece to the saw.
4. Cut approximately 1/4-inch off the board, so that there
is at least a 1/8-inch offcut. This offcut ensures that
the sawblade will be stable because there is wood on
both sides of the blade during the entire cut.
5. Rotate the board with side #2 against the fence and
repeat the same cut. Note that the side previously cut
is now against the fence for each of the four cuts
described below.
6. Rotate the board to side #3 against the fence and
repeat the same cut.
7. Rotate the board to side #4 against the fence, but this
time, make the cut a little wider, so that the offcut is
large enough to handle without breaking it
(approximately 1/4 to 1/2 inch wide).
8. Discard the first three offcuts, but the fourth offcut is
the calibration offcut.
9. Measure the length of the fourth offcut. The accuracy
of this measurement is not critical, so a standard tape
measure or ruler will suffice.
10. Measure the width of the fourth offcut at both ends (as
labeled “Right” and “Left”). These two measurements
are critical, so use the best method you can.
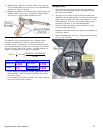
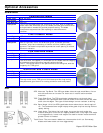
Calculating the Error
The equation for calculating the error is shown below,
however, the electronic version of this manual also
contains a built-in calculator. To use the calculator, enter
your measurements (in either mm or inches) in the boxes
and click on the “Calc Error” button. The calculated error
(angle) is displayed to the right of the button.
⎥
⎦
⎤
⎢
⎣
⎡
−
×=
Length
WidthRightWidthLeft
ArcError sin
4
1
Built-in Electronic Calculator
Width Left Width Right
Length
If the answer is a negative number (Right side wider than
Left side), then your saw is cutting too much to the left of
center. If the answer is a positive number, your saw is
cutting too much to the right of center.
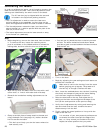
Adjusting the Saw
1. With the miter handle out of the way, loosen only the
middle screw on the miter gauge, and then move the
miter handle back to zero.
2. Engage the miter lock by pressing down on the lock
handle (see page 12). This locks the miter gauge to
the miter handle, and prevents the gauge from moving
until you are ready to move it.
3. Loosen the remaining two screws on the miter gauge,
and gently tap sideways on the miter handle to move
the gauge as needed.
4. Retighten all three screws.
5. Repeat the calibration procedure to verify the results.
0.500
0.500
8.0
0.000
Calc Error