


10
3.4 Chips extraction
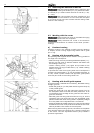
Chips and dust from routing can be removed by means of a
suction hood (2.1). See-through plastic material gives good
view of rotating tool.
- Fit hood into provided seat at platen and snap into fitting
groove (2.2).
This suction hood can be used only for cutters up
to 55mm diameter.
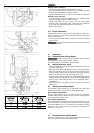
c) Increasing the milling depth
Open the clamping lever (5.4) and press the tool down until
the stop cylinder touches the sensing stops.
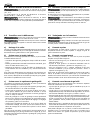
Milling cutter insertion
- Insert the milling cutter into the clamping collet.
- Turn the spindle until the spindle stop (3.1) catches when
pressed and the spindle is locked in place.
- Tighten the collet nut (3.2) with a 22 mm open-end spanner.
Milling cutter removel
- Turn the spindle until the spindle stop (3.1) catches when
pressed and the spindle is locked in place.
- Loosen the collet nut (3.2) using a 22 mm open-ended
spanner until a resistance is felt. Overcome this resistance
by turning the open-ended spanner even further.
- Remove the cutter.
4 Operation
4.1 Adjusting the milling depth
Before adjusting the milling depth always
disconnect the mains plug from the socket!
The milling depth is adjusted in three stages:
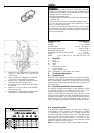
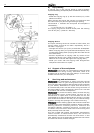
a) Setting the zero point
- Open the clamping lever (5.8) so that the stop cylinder (5.3)
can be moved freely.
- Place the router with router table (5.5) onto a smooth surface.
Open the clamping lever (5.4) and press the machine down
until the milling cutter rests on the base. Clamp the machine
tight in this position with the clamping lever (5.4).
- Press the stop cylinder against one of the three sensing stops
of the pivoted turret stop (5.6). The individual height of each
sensing stop (see table beside) can be adjusted with a
screwdriver.
- Push the pointer (5.2) down so that it shows 0 mm on the
scale (5.1).
b) Setting the milling depth
The desired milling depth can be set either with the quick
depth adjustment or with the fine depth adjustment.
Quick depth adjustment:
Pull the stop cylinder (5.3) up until the pointer shows the
desired milling depth. Clamp the stop cylinder in this position
with the clamping lever (5.8).
Fine depth adjustment:
Set the desired milling depth by turning the knurled nut (5.7).
Turn the knurlet nut to the next mark on the scale to adjust
the milling depth by 0.1mm. One full turn adjusts the milling
depth by 1 mm. The maximum adjustment range with the
knurlet nut is 5 mm.