


11
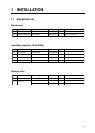
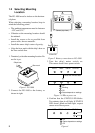
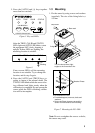
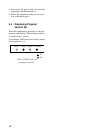
3.3 Diagnostic test
The PG-1000 has a self-test which checks the
circuit board and keys for proper operation.
LED/KEY/ROM/RAM test
1. Disconnect the power cable from the equip-
ment.
2. While pressing the [AUTO] key, reattach
the power cable.
The test sequence is as below.
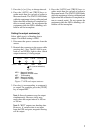
AUTO
TRUE CALIB
STATUS
: On
: Blinking
: Off
Blink twice.
LED lights one by
one from the left-side.
All LEDs go off.
Figure 22 Sequence of LED test
3. Press each key one by one.
LED corresponding to the key lights if the
key is normal.
[AUTO] key: AUTO LED
[TRUE] key: TRUE LED
[-] key: CALIB LED
[+] key: STATUS LED
4. Press the [AUTO] and [TRUE] keys to-
gether more than two seconds after check-
ing all keys. Then, the ROM and RAM are
checked.
AUTO LED lights: RAM is normal.
TRUE LED lights: ROM is normal.
5. Press the [AUTO] and [TRUE] keys to-
gether more than two seconds to escape
from the test. The STATUS LED blinks
while the equipment is being calibrated and
lights when the calibration is completed (re-
turn to normal mode). Do not operate the
sensor while the LED is blinking; calibra-
tion will be incomplete.
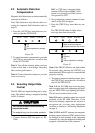
EEPROM/Sensor test
This test checks the EEPROM and sensor. All
default settings (navigation setting, output sen-
tence, output interval, etc.) are restored at the
completion of the test. Do this test after dis-
mounting the equipment.
1. Disconnect the power cable off from the
equipment.
2. While pressing the [TRUE] key, reattach the
cable. All LEDs go off.
3. After AUTO LED lights, turn the equipment
through a circle slowly instead of ship's
movement until TRUE LED lights. The test
proceeds in the sequence shown below.
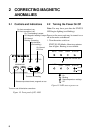
When the equipment finds error, LEDs do not
light.
AUTO TRUE CALIB
STATUS
: On (normal)
: Off (error)
Start
EEPROM:
OK
Mag.
sensor: OK
Angle
sensor:
OK
Rate
sensor:
OK
Figure 23 EEPROM/Sensortest sequence